

One of the more common concerns I hear from larger enterprises moving to modern device management is “how will our corporate network traffic be impacted?” since clients will now pull content and policy configuration from Internet-based content delivery networks (CDN) instead of internal servers. There is little reason for concern here however, as delivery optimization capabilities are built into Windows clients by default. With no additional configuration, devices behind the same external Internet NAT IP will share bits amongst themselves through peer-to-peer content sharing (assuming your network admin hasn’t configured device isolation or other stringent segmenting of clients) ensuring each device doesn’t need to reach out to the Internet to pull the same content. See my previous blog post on how delivery optimization works on Windows clients.
But what happens in a heavily segmented (device isolation) network environment where peer-to-peer sharing between clients is blocked, not feasible, or would create challenges? Well, the experience isn’t as great for the user or Internet bandwidth consumption as the content download must fall back to the content delivery network (Internet-based CDN) for content. For networks configured in this manner, you will likely see an increase in your Internet bandwidth consumption since each client needs to go to the CDN for content. That is until today…
Microsoft is releasing Microsoft Connected Cache for Enterprise & Education (Standalone edition or v2 are also common names for this solution) which is going into public preview on October 30, 2024, to address this exact scenario. Microsoft Connected Cache node(s) can be deployed to on-premises networks. Then, devices on the local networks can be configured to look to these cache sources to pull content. This centralizes and optimizes the flow of cached content to devices when peer-to-peer content sharing using delivery optimization is not allowed, or more centralized content caching is desired/warranted. While this solution (Connected Cache) has existed for customers leveraging Microsoft Configuration Manager for several years now, this release marks the first time MCC will be available as a standalone solution without Microsoft Configuration Manager!
The v2 or standalone connected cache solution has been in private preview for some time (which I unfortunately didn’t get access to, like many others) so I was EXTREMELY excited to hear that I would be one of the first, few people to gain access to the public preview bits during the Midwest Management Summit (MMS) Fort Lauderdale conference session Andy Rivas (Microsoft) and Carmen Forsmann (Microsoft) led. Thank you both for the informative session and early access to the bits!
Side note, if you haven’t been to an MMS conference before, I HIGHLY recommend! I met several, very passionate and knowledgeable industry peers and Microsoft employees while learning a ton of valuable information. If you enjoy going deep into technical content, this conference is perfect for you! No marketing fluff, just real-world experiences shared with the greater management community. I can’t wait to attend the next MMS conference!
Microsoft Connected Cache Enterprise & Education is configured from within the Azure portal. Although it is deployed from the Azure portal, the solution does not incur monthly Azure costs. Customers licensed for Microsoft 365 E3/E5/A3/A5 are entitled to the solution for free. Here’s the official docs from Microsoft: MCC for Enterprise and Education Overview | Microsoft Learn
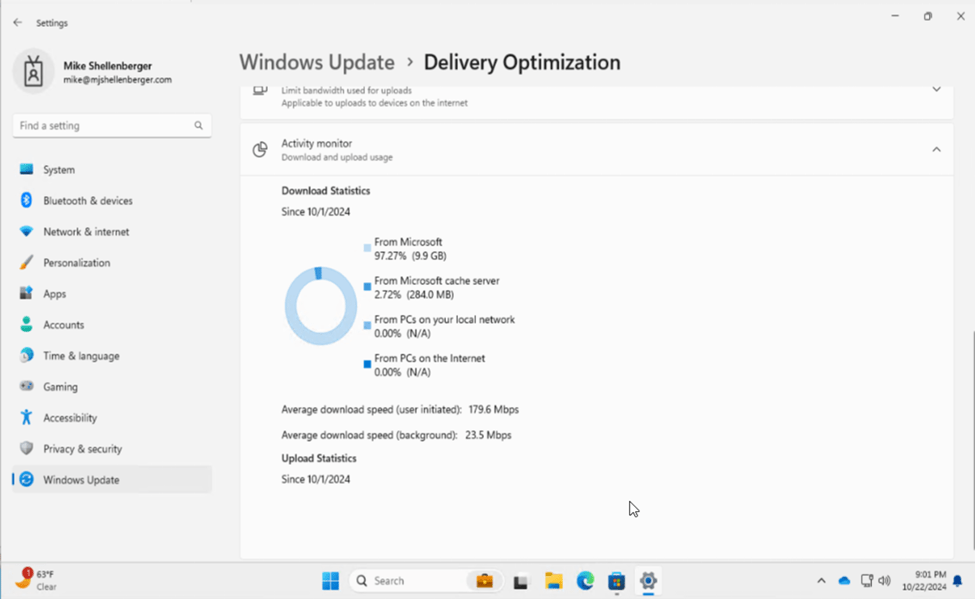
Before we dive into my demo lab install, let’s take a look at the delivery optimization report on a test client from my local network, first.

You can see from the screenshot that all content is current being sourced directly from the CDN on the public Internet as indicated by the category “From Microsoft”.
There are multiple options for deploying MCC cache deployment nodes onto your networks. In my case, I chose a Windows Server 2022 instance I specifically prepared for this purpose.
- Step one is to create a connected cache deployment in Azure (Click this link or open the Azure Portal and search for “Connected Caches for Enterprise & Education“). My deployment was done to the West US region, and I used a new resource group in Azure.
2. Next, I created a Connected Cache Node by going to Cache Node Management >Cache Nodes > Create Cache Node.

I specified a name for my local cache server, choose the Windows installation and clicked Create.
3. Next, I deployed a Windows Server 2022 VM in my Hyper-V lab environment.
- Since my host was a VM running on Hyper-V, I had to enable nested virtualization for the virtual machine: Set-VMProcessor -VMName <VMName> -ExposeVirtualizationExtensions $true (Widows Subsystem for Linux (WSL) requires this to run the container image for MCC nodes)
- I installed WSL using roles and features (alternatively you could also use wsl.exe –install command)
- I then ran wsl.exe -–update to bring down the latest Linux kernel (MCC Node Deployment script will fail unless the WSL instance is running the latest kernel)
4. Next, I ran the provisioning script from the Azure portal, combined with some custom provisioning package information I received for the early preview. (Note: My experience was different since I gained early access to the bits and downloaded from a different location. When released into public preview, you should be able to simply click the “Download Provisioning Package” button in the Azure portal which will give you the exact command line and package to run on the server.)
./provisionmcconwsl.ps1 -installationFolder c:\mccwsl01 -customerid [CustomerIDFromAzurePortalScriptNoQuotes] -cachenodeid [CacheIDFromAzurePortalScriptNoQuotes] -customerkey [CustomerKeyfromAzurePortalScriptNoQuotes] -Registrationkey [RegistrationKeyFromAzurePortalScriptNoQuotes] -cacheDrives “/var/mcc,50” -mccRunTimeAccount SERVERNAME\administrator -mccLocalAccountCredential SERVERNAME\administrator
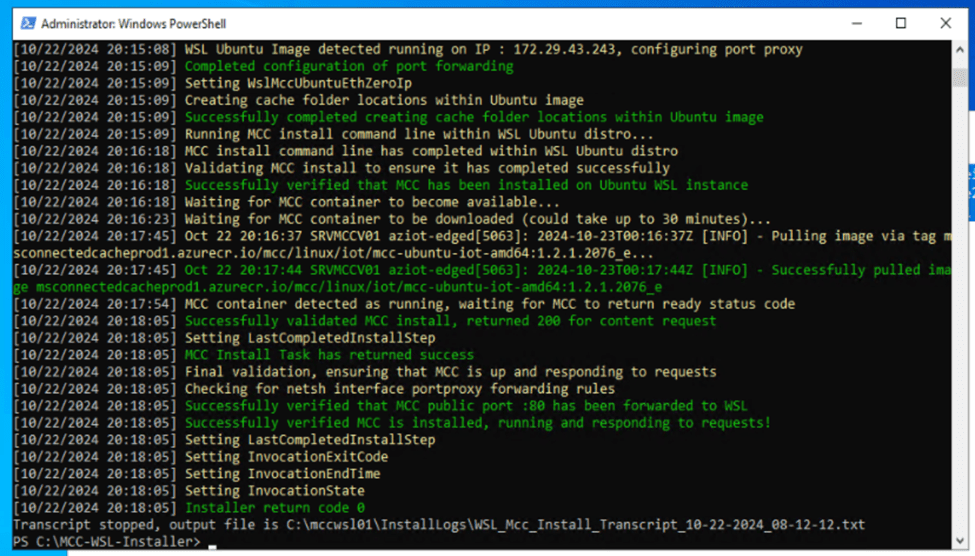
5. I then verified successful installation of the cache node from install logs displayed on-screen:
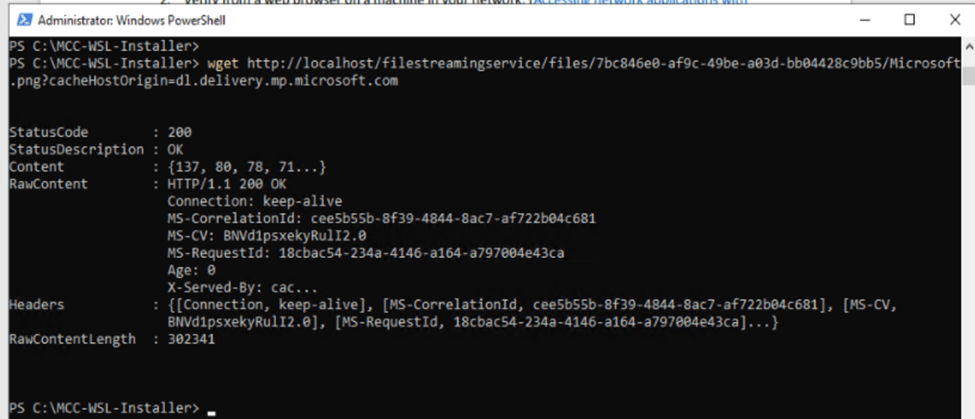
Another way to validate the successful installation of the node from the server itself is by running the command: wget http://localhost/filestreamingservice/files/7bc846e0-af9c-49be-a03d-bb04428c9bb5/Microsoft.png?cacheHostOrigin=dl.delivery.mp.microsoft.com
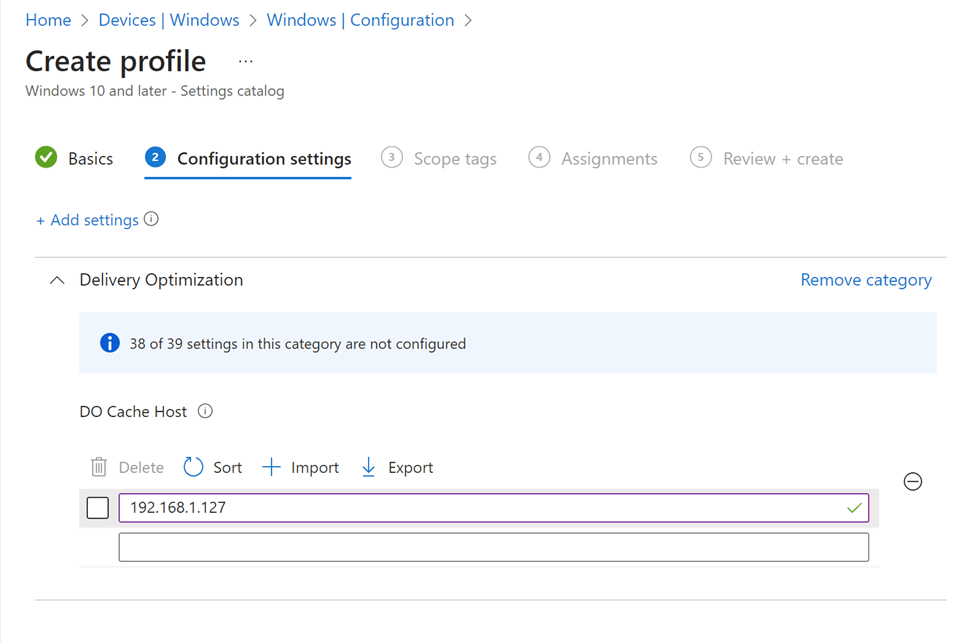
A third option to validate successful operation from clients on the network (192.168.1.127 is the IP of my MCC server instance) is by opening a web browser on the client and navigating to: http://192.168.1.127/filestreamingservice/files/7bc846e0-af9c-49be-a03d-bb04428c9bb5/Microsoft.png?cacheHostOrigin=dl.delivery.mp.microsoft.com

The .png download indicates the service is responding correctly.
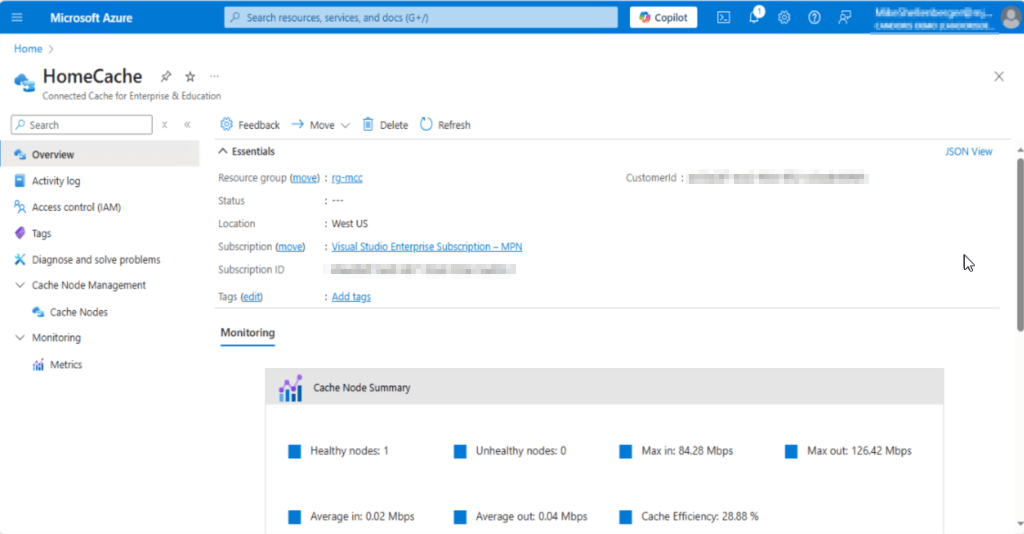
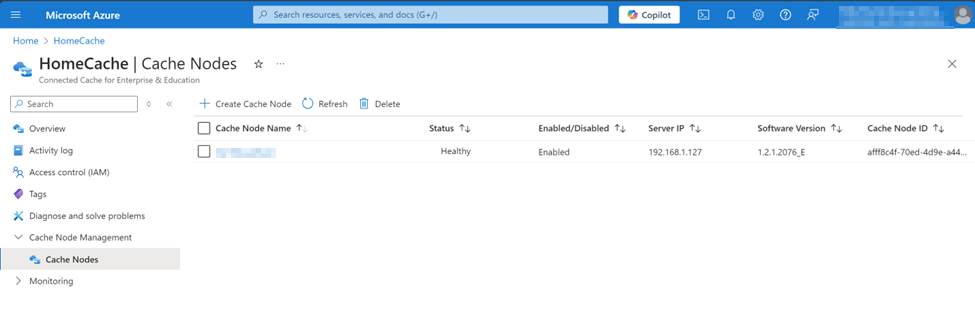
A healthy, deployed node is now showing in Azure portal under connected cache nodes:
As the next step in my testing, I created a policy in Intune for my test clients to use the newly deployed MCC node. (Note: you could also use something like group policy and DHCP scope options to inform clients of the local connected cache node and their Group ID)

I made sure my test client was assigned and received the updated configuration policy from Intune, then I used the test client to retrieve an app directly from the Microsoft App Store. I then ran the delivery optimization report on the test client once again – and look at the new results!
Content was pulled through the new Microsoft Connected Cache server, successfully! I look forward to continuing to play with this solution more, but I can already see MASSIVE benefits for customers moving to modern managed Windows clients. The simplicity of deployment was great and was worth the long wait. More to come on Microsoft Connected Cache!

Leave a comment