
Overview
Microsoft Cloud PKI is a new offering from Microsoft that debuted in February of 2024. The solution is part of the Intune Suite add-on SKU but can also be purchased standalone. No existing Microsoft 365 bundles include this solution so you must purchase it. The concept is to take the arduous task of deploying and maintaining a proper two-tier PKI along with all the associated infrastructure for Network Device Enrollment Service (NDES)/ Simple Certificate Enrollment Protocol (SCEP) and Intune connections and create a turnkey solution where Microsoft hosts and maintains this all for you. Spoiler alert: They succeeded!
- Overview
- On-Premises PKI Deployments
- Deploying and Configuring Microsoft Cloud PKI
- Deploying Certificates in Intune using Cloud PKI
- FAQ
Before we dive into the Cloud PKI deployment details, let’s set the stage for what a traditional Intune-connected, on-premises PKI looks like without the Cloud PKI solution…
On-Premises PKI Deployments
A proper PKI is at least two tiers, a root CA and an issuing CA. On-premises, this typically looks like two Windows Servers running the Active Directory Certificate Services roles. The root CA is typically not joined to an Active Directory domain and is typically kept in a powered off state to keep it secure (This server should be powered up at least once a month for updates, though). The issuing CA is joined to the Active Directory domain and is configured as a subordinate to the offline root CA. All the certificate work is done on the issuing server. While this docs article is older and a bit outdated, the overall process and steps are pretty similar to how you would deploy this today on the latest gen Windows Server operating systems.
Before modern, cloud-managed devices, this architecture was enough to deploy certificates to domain-joined Windows clients with a simple group policy object. The certificates could then be used for a myriad of purposes such as 802.1x, VPN’s, code-signing, secure client communications, etc. With modern, cloud-managed devices, more specifically Entra joined Windows devices, there is no group policy or inherent trust of the certificate authority infrastructure since it’s all tied to Active Directory and not Entra ID. To address this obstacle and still take advantage of certificate-based authentication services, the SCEP protocol and Intune Connector software is employed.
SCEP is an older certificate protocol originally developed by Cisco to address the need to automatically enroll certificates from a PKI onto network devices with no assigned user. The concept was that a network device could use this protocol to make a request to a CA for a certificate, prove its device identity, and enroll a trusted certificate successfully from the CA without user/admin involvement.
In the case of a Microsoft-based PKI, the Active Directory Certificate Services sub-role “NDES” is employed to leverage the SCEP protocol. An NDES server is the third server that gets deployed and configured to interoperate with the issuing CA server. For detailed guidance on setting up NDES specifically for interoperability with Intune, see this article.
Since Intune is a cloud-based service and all the certificate services infrastructure deployed is on-premises, we need a conduit for Intune to interoperate with the PKI. This is done through the Intune Certificate Connector. The connector installation is perhaps the easiest part of all of this so far! Despite the connectors purpose of allowing Intune to communicate with the NDES Server, windows clients will still need the ability to communicate directly with the NDES server regardless of their network location. Simply publishing access to the NDES server URL’s through a firewall is asking for trouble, so the recommendation here is to employ the services of a reverse-proxy solution that can pre-authenticate authorized traffic before allowing the session to be established. For most customers, Entra ID app proxy can be employed for this task.
The last step is to deploy the root and issuing CA certificates as trusted CA certificates on your clients to build a certificate chain of trust. You then create a SCEP certificate configuration profile for targeted devices/users. This is done with Intune device configuration profiles. Once the profiles are assigned to devices/users, the certificate enrollment process kicks off.
Are you still with me? If you’ve looked at any of the aforementioned links, you can probably see the deployment and configuration isn’t the simplest of tasks and can likely agree with me that the additional on-premises infrastructure overhead seems counterintuitive to the whole point of moving to the cloud. I’ve been through this installation multiple times for several customers, and I can tell you from experience that the process is time consuming and must be executed perfectly or you will chase your tail troubleshooting log files. This is the biggest reason Microsoft Cloud PKI makes so much sense to me!
Deploying and Configuring Microsoft Cloud PKI
Now let’s switch gears and look at the incredibly simplified process of deploying the exact same architecture, this time in the cloud via Microsoft Cloud PKI.
Pre-requisites
- You must own the Intune Suite SKU bundle or the Microsoft Cloud PKI standalone license. These licenses are deployed to users who will leverage devices that will enroll certificates from the PKI.
A word of caution here on the trial licenses offered by Microsoft. One of the limitations of the trial Cloud PKI solution is that the keys for the NDES service are software-bound, and not protected by an HSM. The paid for SKU’s include Azure-based HSM services for key storage which is WAY more secure that software-bound keys. There is no way to migrate software-bound keys to HSM post-trial so you will be stuck re-provisioning your deployment!
- Devices already enrolled in Microsoft Intune. These can be Windows, iOS, iPadOS, Android or macOS. Linux SCEP support is not built into Intune at this point in time.
Deploying the Cloud PKI Root CA
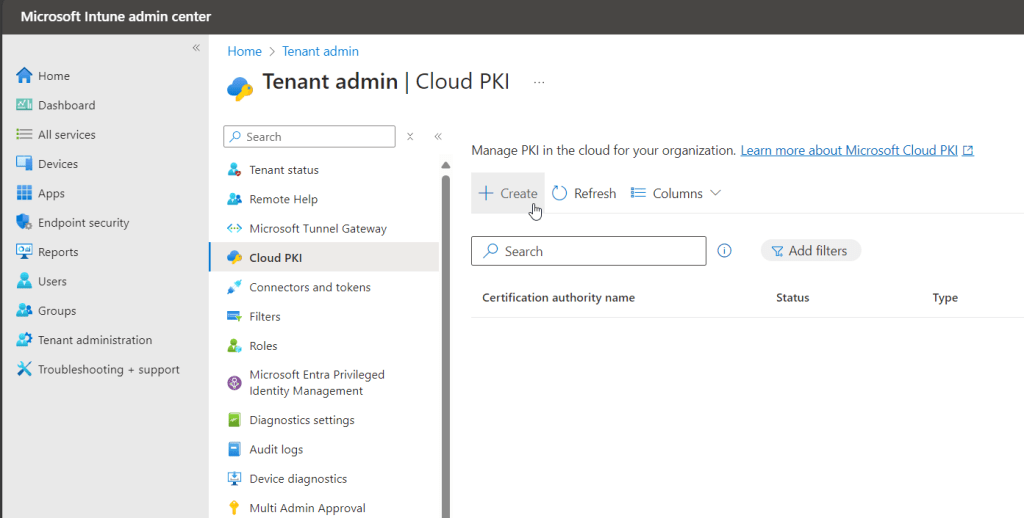
Open the Intune management console and navigate to Tenant Administration > Cloud PKI.
Select the Create button to start a new CA deployment.
Give the root CA deployment a Name and Description, then click Next. Don’t stress about the name as it’s not asking you for the actual CA name at this point – just a friendly name for this CA deployment. The actual CA name comes later.
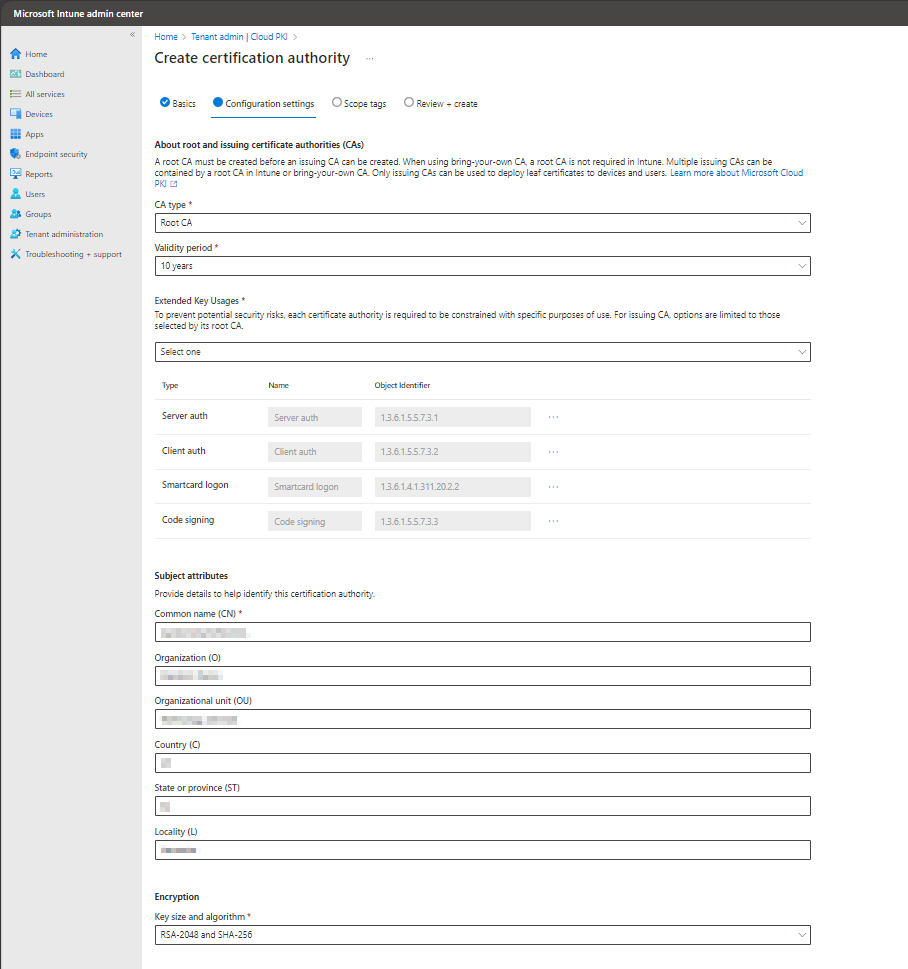
On the Create Certification Authority screen:
- From the CA Type dropdown menu, choose Root CA.
- Choose a Validity Period to meet your organizations requirements (5, 10, 15, 20 and 25 years are available options).
- Under Extended Key Usages, select all of the key usages you will require. For most environments where 802.1x, VPN, Windows Hello for Business hybrid deployments, etc. are the use cases for certificate-based authentication, Server auth, Client auth, Smartcard logon usages typically suffice. HOWEVER – if you decide you want to add another usage post-deployment, you are out of luck as these settings will no longer be editable on the CA. So, think ahead to future use cases but also be prudent in what you select as limiting the scope of the actual CA key usages helps secure the environment.
- Set the Subject attributes for the root CA server
- Common Name (CN): This is the name you’d like to give your root CA
- Organization: Typically, something like the company name or department name
- Country: Self-explanatory
- State or province (ST): Self-explanatory
- Locality: Self-explanatory
- Under encryption, select a Key Size and Algorithm that meets your organizations requirements. *Note that RSA-1024 and SHA-1 are not available as they are no longer secure
Click Next to continue.
Optionally assign Intune scope tags, as necessary. Click Next.
On the Review + Create page, review all the previous settings to confirm accuracy, then click Create to deploy your root CA.
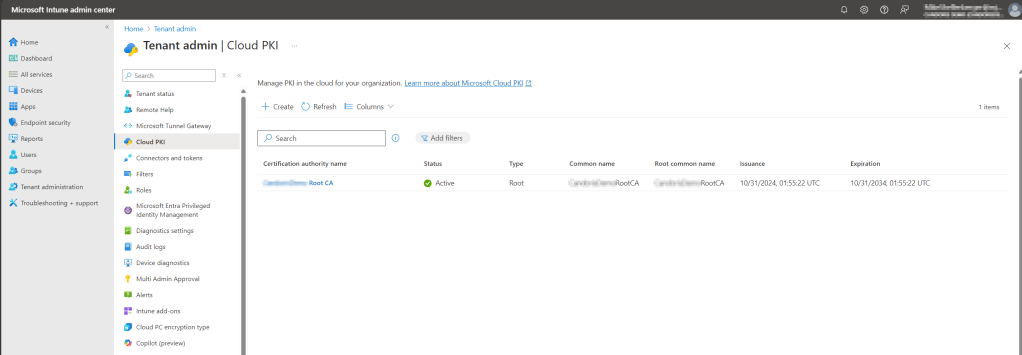
After a few moments, you should receive a notification in the console that the root CA was created successfully. Click the Refresh button on the Cloud PKI console page to see the new CA in the list.
Next, we will provision our issuing CA using almost the same steps with a few minor modifications.
Deploying the Cloud PKI Issuing CA
From the Cloud PKI management screen, select the Create button again to start another new CA deployment.
Give the CA deployment a Name and Description, then click Next. Again, don’t stress about the name as it’s not asking you for the actual CA name at this point – just a friendly name for this CA deployment. The actual CA name comes later.
On the Create Certification Authority screen:
- CA Type: Issuing CA
- Root CA Source: Intune (I’ll explain the “Bring your own root CA” option later in this article)
- Root CA: Select your Root CA Server
- Choose a validity period to meet your organizations requirements. Note that you cannot set the value to something greater than the timeframe set for the Root CA’s validity.
- Under Extended Key Usages, select all of the key usages you will require. Note that only the key usages selected for the previously created root CA are available for use.
- Set the Subject attributes for the root CA server
- Common Name (CN): The name you’d like to give your Root CA
- Organization: Typically, something like the company name or department name
- Country: Self-explanatory
- State or province (ST): Self-explanatory
- Locality: Self-explanatory
- The key size and algorithm are inherited from the root CA so nothing required to select here.

Click Next to continue.
Optionally assign Intune scope tags, as necessary. Click Next.
On the Review + Create page, review all the previous settings to confirm accuracy, then click Create to deploy your issuing CA.
After a few moments, you should receive a notification in the console that the issuing CA was created successfully. Click the Refresh button on the Cloud PKI console to see the new CA in the list.

Guess what? That’s it for the Two-tier CA deployment and configuration in the cloud! No NDES setup, Intune Connector installation, or Entra ID App Proxy configuration required. You’re now ready to deploy the trusted CA certificates and SCEP configuration profiles to client devices.
Deploying Certificates in Intune using Cloud PKI
Before we can begin enrolling certificates for users/devices, we must first setup the “chain of trust” by deploying the root CA and issuing CA certificates to client devices. This will ensure the clients trust where the enrolled certificates they request are coming from. To do this, we will create a trusted certificate profile for each CA and for each device operating system platform we plan to support certificate enrollment on. Step one is to download the root and issuing CA certificates from our newly created CA’s in the cloud so we can deploy them.
Download CA Certificates
From the Cloud PKI management screen, click on the root CA we just created. Then click the Download button next to Download certificate.
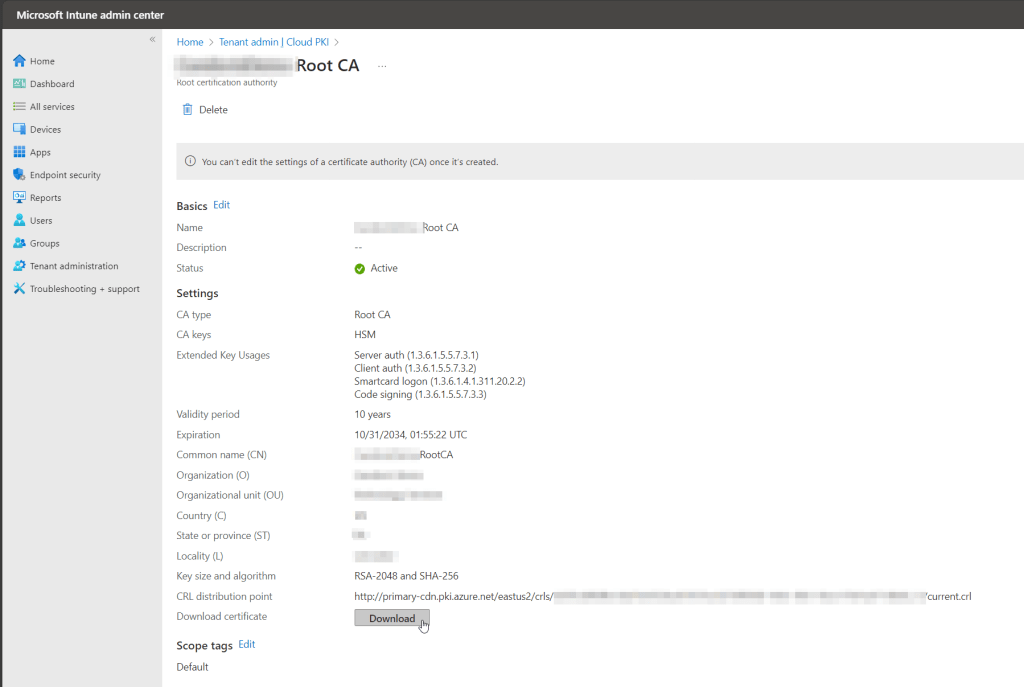
Save the .cer file to your computer. Perform the same steps for the issuing CA, downloading it’s .cer file to your computer as well.
Deploy Root CA Certificate
Now we will create the necessary profiles to distribute the CA certificates. From the Intune Management Console, select Devices, then under Manage Devices, select Configuration.
Click the Create dropdown, then select New Policy.
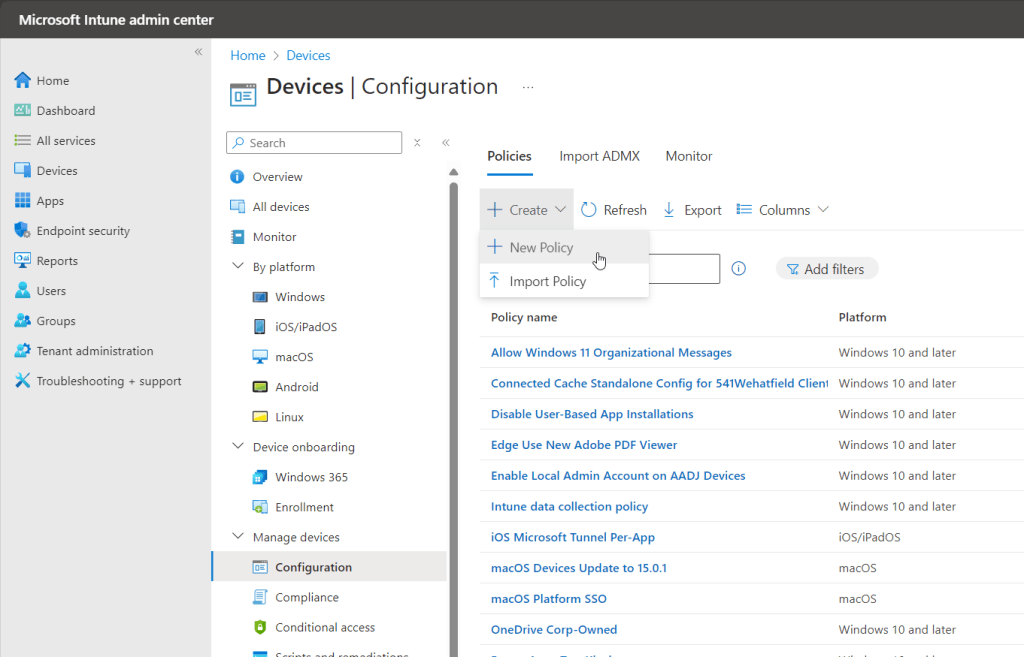
For Platform, select Windows 10 and later (or whatever platform you are targeting. In this example, we will be looking at the Windows endpoint workflow). For Profile Type, select Templates, then Trusted Certificate.
The profile type Templates will be removed from Intune in the near future as Settings Catalog is the preferred place to configure all new policies. If you have profiles deployed from Templates today, it would be advisable to start converting these over to Settings Catalog policies before the end-of-life. That being said, Certificate Trust is currently only configurable via Templates at the posting time of this article.

Give the new profile a Name and Description, then click Next.
On the Configuration Settings screen, upload the root CA certificate previously downloaded. Set the Destination Store to Computer certificate store – Root.

Click Next to proceed.
On the Assignments screen, I’m choosing to apply this to All Devices enrolled in Intune with a filter set to only my Windows 10 & Windows 11 devices. While you can certainly do the same by creating a dynamic group in Entra ID to contain only Windows 10 & Windows 11 devices, dynamic groups can take several hours to update, and I need new devices to receive these trusted certificates ASAP during device enrollment/provisioning. Using the All Devices assignment with a filter to only Windows 10 & 11 devices is the most efficient workflow in this case.
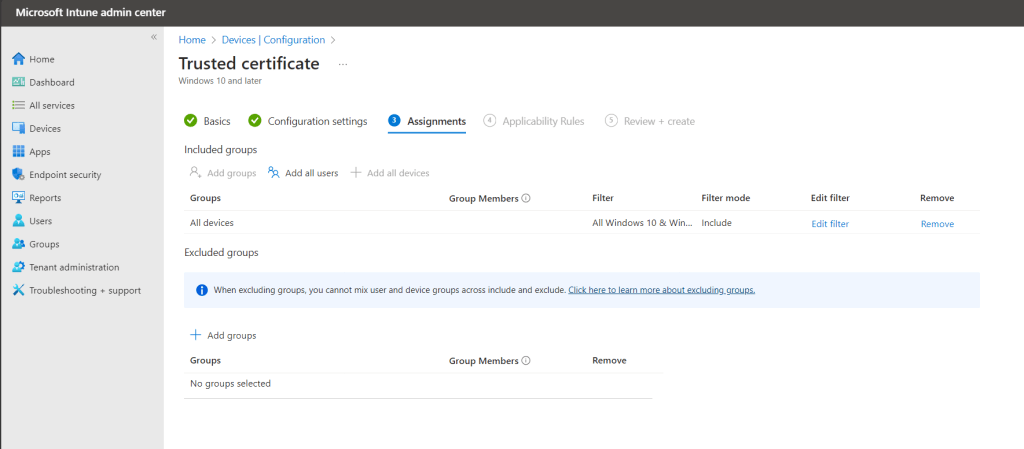
Click Next.
On the Applicability Rules, leave everything here as is and click Next.
Verify your settings on the Review + Create screen, then click Create to deploy the profile.
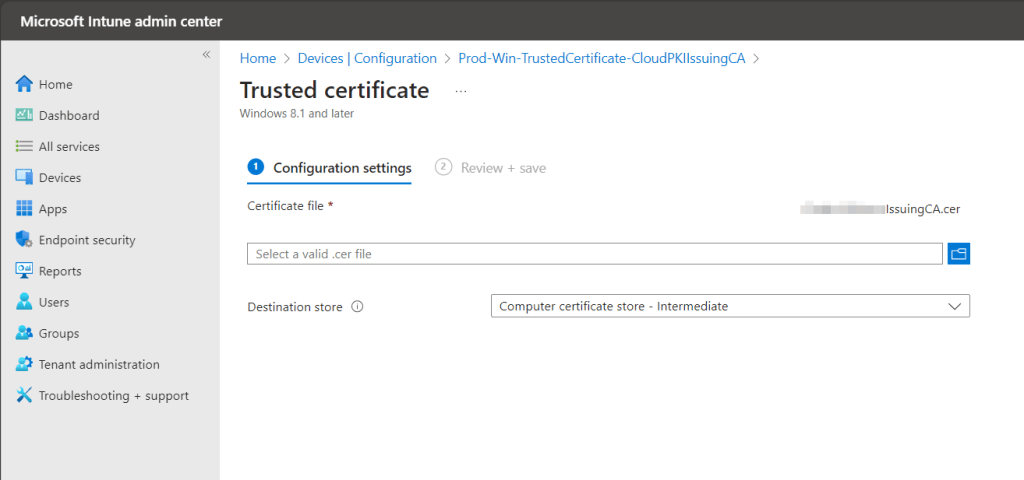
Deploy Issuing CA Certificate
Repeat the same new profile creation process for the issuing CA. Ensure you specify the issuing CA certificate when uploading the .cer file and select the Computer Certificate Store – Intermediate destination store instead of the Root store.
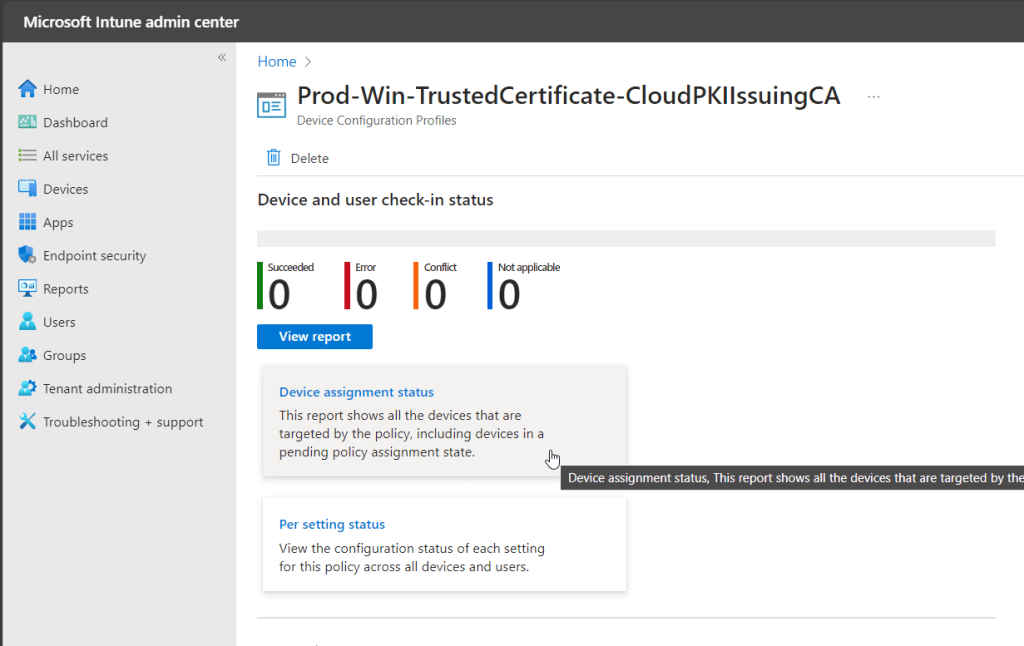
Allow these policies time to apply to client devices before proceeding to the next step of creating and deploying the SCEP profile. We need the certificate trust chain to be in-place or the SCEP certificate provisioning will not work. Use the Device Assignment status report for the two configuration profiles to validate.
Once the trusted CA profiles have applied and the certificate trust chain is in place, we can request the device/user enroll a certificate from Cloud PKI using SCEP. To do this, we target a SCEP certificate profile to each OS platform where a certificate should be enrolled. Before we create the configuration profile, we need a bit of information from the issuing CA. In particular, we need the SCEP URI property. To find this value, view the properties of the issuing CA from the Cloud PKI interface.
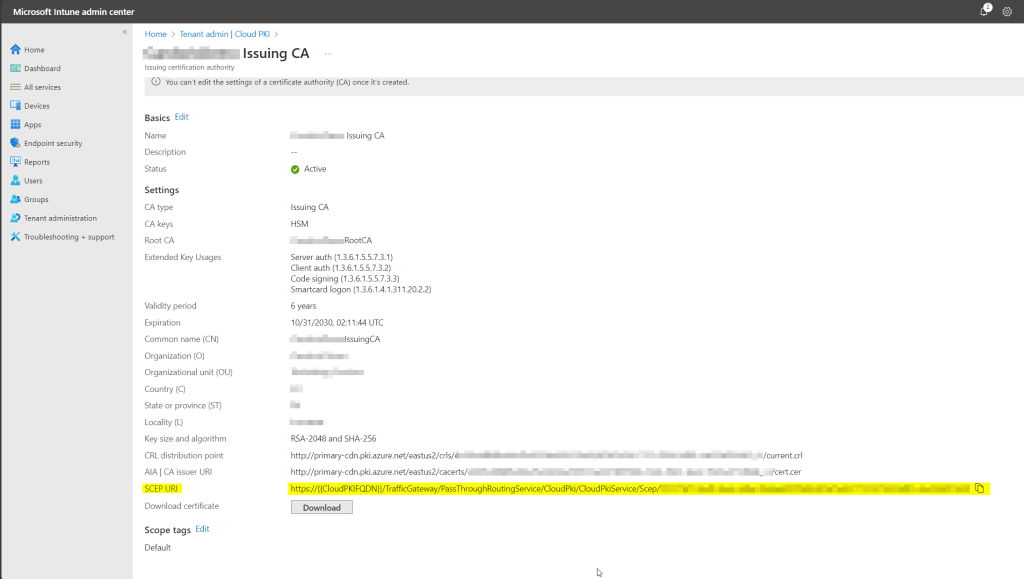
Copy or Save the value of the SCEP URI as you will need it shortly.
Deploy SCEP Certificate Profile
From the Intune Management Console, select Devices, then under Manage Devices, select Configuration.
Click the Create dropdown, then select New Policy.
For Platform, select Windows 10 and later (or whatever platform you are targeting. In this example, we will be looking at the Windows endpoint workflow). For Profile Type, select Templates, then SCEP Certificate.
The profile type Templates will be removed from Intune in the near future as Settings Catalog is the preferred place to configure all new policies. If you have profiles deployed from Templates today, it would be advisable to start converting these over to Settings Catalog policies before the end-of-life. That being said, SCEP certificate is currently only configurable via Templates at the posting time of this article.

Give the new profile a Name and Description, then click Next.
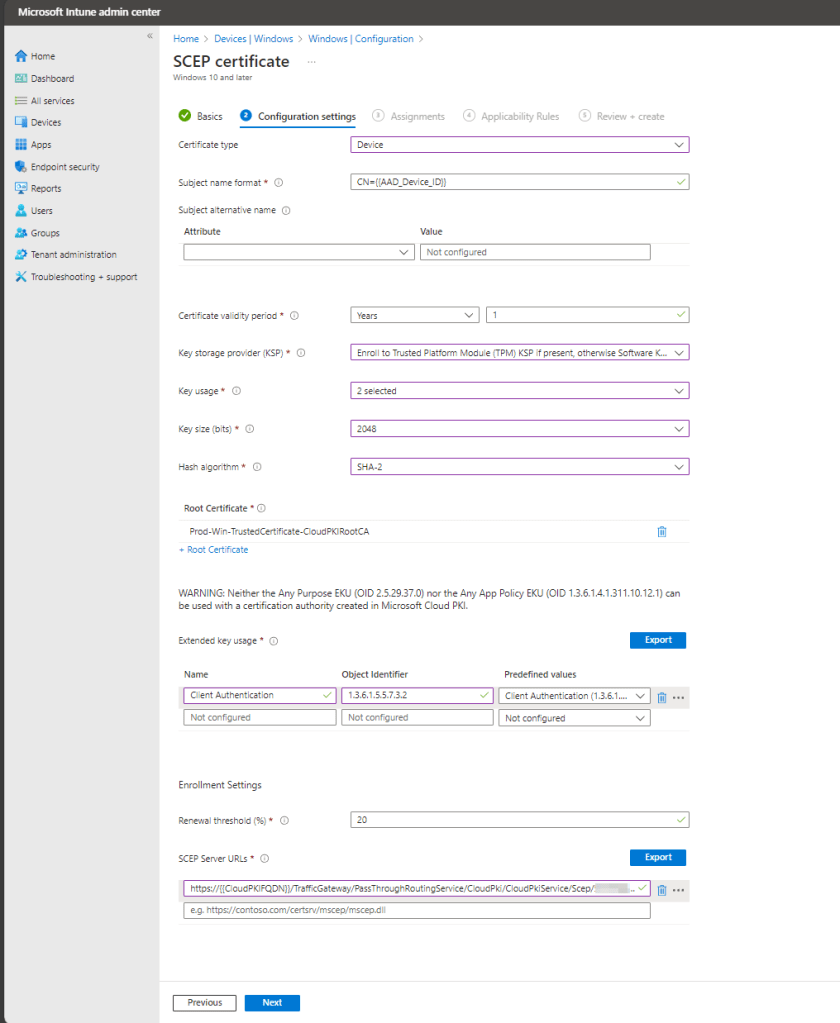
On the configuration settings page, set values based on your environment requirements. Example values for typical device configuration of certificate authentication to 802.1x/VPN are provided here:
- Certificate type: Device
- Subject name format: CN={{AAD_Device_ID}}
- Certificate validity period: Years – 1
- Key storage provider (KSP): Enroll to Trusted Platform Module (TPM) KSP if present, otherwise Software KSP.
- Key usage: Digital Signature, Key encipherment
- Key size: 2048
- Hash algorithm: SHA-2
- Click + Root Certificate and select your root CA

- Extended key usage: Select Client Authentication and allow the Object Identifier and predefined values cells to auto-populate.
- Renewal threshold (%): 20
- SCEP Server URLs: Paste the SCP URI here that you previously copied (leave the {{CloudPKIFQDN}} variable as part of the URL as it’s necessary)
Click Next to continue.
On the Assignments screen, I’m choosing to apply this to All Devices enrolled in Intune with a filter set to only my Windows 10 & Windows 11 devices. You will want to scope your assignments to target any devices/users that need certificates for authentication.
On the Applicability Rules screen, we’ll leave everything blank and click Next.
Verify your settings on the Review + Create screen, then click Create to deploy the profile.
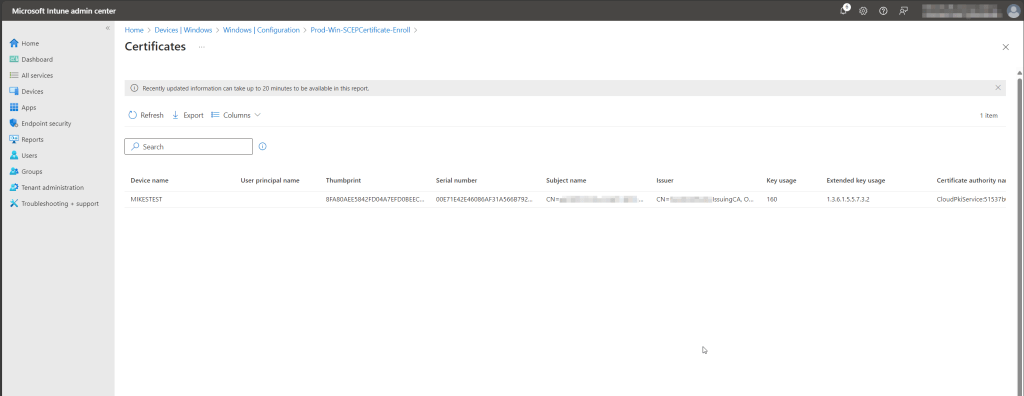
Allow time for your devices to retrieve the new policy configuration and enroll certificates. To validate the certificate enrolled successfully, select the SCEP configuration profile you just created and click the Certificates report.

You should see your device(s) and associated certificates!
FAQ
- Should I be more concerned that my PKI is going to be in the cloud and not within the confines of my corporate network? In my opinion, there is no need to be more concerned about security when using Cloud PKI versus on-premises. I’m a believer that the massive machine that is Microsoft can do a better job than any one of us trying to defend and keep up with maintaining our on-premises infrastructure and software. In particular to the Cloud PKI solution, the fact that the key storage is HSM backed is a huge security improvement over almost all the NDES/SCEP deployments I’ve seen on-premises as most organizations don’t bother going to the extent of spending tens of thousands of dollars on an HSM appliance for this task.
- Why does Cloud PKI allow me to provision more than two certificate authorities if a two-tier PKI is enough? While I’m not 100% sure of all the scenarios where this might be warranted, CA’s can be assigned scope tags which in turn allows role-based access control to administer them. I could see a scenario where different business units operate in the same Intune tenant but need to have different certificate authentication administrators. Having multiple CA deployments would allow for this. If you have any other ideas why you might want mutiple Cloud PKI CA’s drop a suggestion in the comments and let me know!
- Can I provision certificates to other devices/services other than users/devices managed by Intune? For example, SSL certificates for IIS or server certificates. No, not at this time. Only Intune enrolled devices (Windows clients, macOS, iOS, iPadOS and Android devices) can leverage Cloud PKI. There does appear to be some roadmap discussion about expanding the capabilities in the future, so stay tuned!
- What is the “Bring Your Own CA” option when I create a new CA deployment? If you are already heavily invested in certificate-based authentication with an on-premises PKI today, you have likely gone through a fair amount of work to setup the certificate trust chain. Perhaps you still have devices that are only joined to Active Directory and not hybrid-joined, Servers that need SSL certificates, or devices that are not under Intune management. In these cases, it may be useful to keep that on-premises PKI around for now. But you can ease the administrative burden and start moving your Intune managed devices over to Cloud PKI to take advantage of the simplified architecture. Choosing the “Bring your own CA” option when creating a new CA in the Cloud PKI console allows you to generate an issuing CA and associated certificate signing request (CSR) which can then be submitted to your existing on-premises root CA for signing. This allows you to essentially extend your on-premises PKI deployment to the cloud and take advantage of the increased security and lack of required NDES/SCEP setup. The certificate trust chain already exists for your root CA across the organization so this scenario can be considered less risky than introducing an entirely new PKI.
Are you finding the content on my site particularly helpful? Please consider donating to help me offset the costs of maintaining this site. Your support is greatly appreciated!


Leave a comment