

Series Overview
In this series, I will cover multiple options for deploying Windows 11 upgrades in the enterprise leveraging native Microsoft tooling. While each part will serve as a step-by-step guide for leveraging different Microsoft solutions to deploy the upgrade, I assume you’ve already taken the necessary steps to thoroughly plan and pilot Windows 11 in your environment. While Microsoft has made the transition from Windows 10 to Windows 11 the easiest operating system upgrade yet, it’s still prudent to perform application compatibility testing, driver testing, user adoption awareness training, etc. to ensure a smooth, rollout with minimal impact to the business.
Part I – Deploying Windows 11 Upgrade via Microsoft Configuration Manager Task Sequences
If your organization has not yet taken steps to migrate towards modern, cloud-based device management with Microsoft Intune, the best, and only, Microsoft solution for full lifecycle Windows device management is Configuration Manager. There are three options for deploying an in-place Windows 11 upgrade to Windows 10 clients. The first method is the use of a task sequence to deliver the operating system upgrade package. Part I will focus on this option. The remaining two methods leverage native Software Updates or Windows Servicing via Configuration Manager. The latter will be covered in Part II of the series.
Note: While there are ways to perform a “wipe and reload” style migration to Windows 11, it is a more difficult and less successful method than the in-place upgrade. The in-place upgrade used to be frowned upon in the enterprise, but Microsoft has made major changes to how the in-place Windows upgrade works and it is now the simplest and most effective way to upgrade devices. I will only cover methodologies for performing in-place upgrades to Windows 11 in this series.
- Series Overview
- Part I – Deploying Windows 11 Upgrade via Microsoft Configuration Manager Task Sequences
- Preparing Configuration Manager for Windows 11 Upgrade Deployment
- Validating Windows 10 Client Upgrade Readiness (Using Built-In Tooling)
- Configuring a Site for Windows 11 Upgrade Deployment
- User Experience Upgrading to Windows 11 from a Task Sequence
Preparing Configuration Manager for Windows 11 Upgrade Deployment
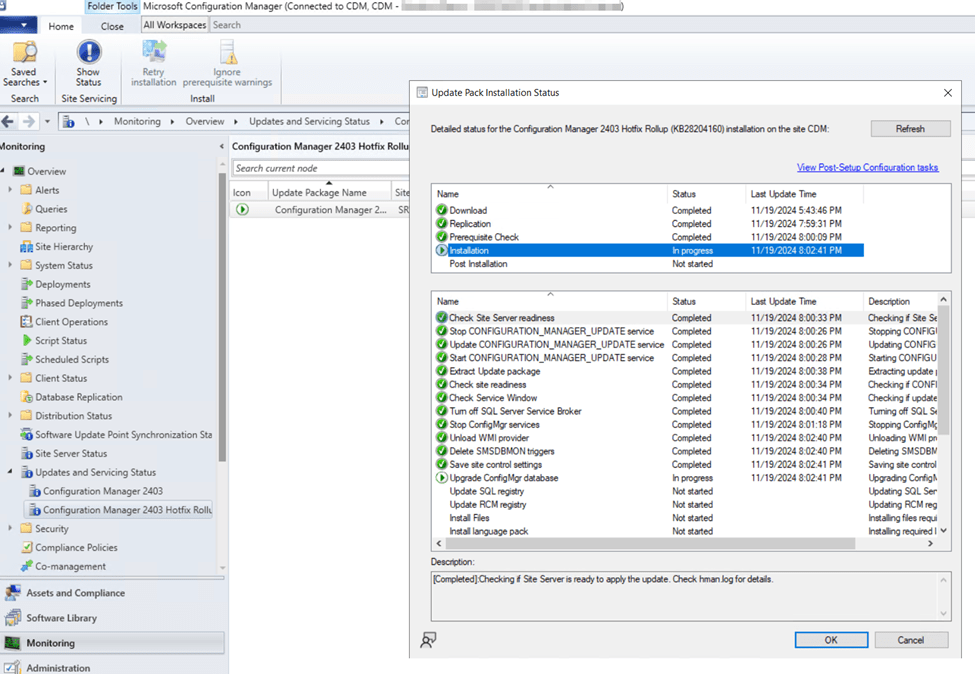
First, ensure you Configuration Manager site is up to date with available updates and hotfixes. As of the posting of this article, 2403 with Hotfix Rollup KB28204160 is the latest. To apply site updates, navigate to Administration > Updates and Servicing.
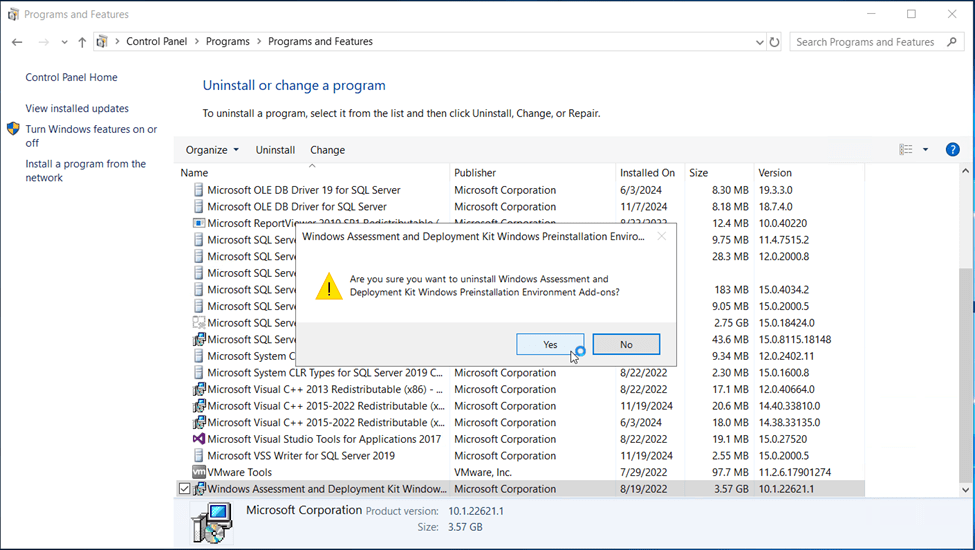
Next, make sure the Windows Assessment & Deployment Toolkit (ADK) is up to date on your site server. As of the posting of this article, 10.1.26100.1 – May 2024 is the latest version. The following steps walk through the process of updating the Windows ADK on the site server:
- Uninstall any older versions of Windows Assessment & Deployment Toolkit (ADK) using add/remove programs from control panel.

- Uninstall any older versions of Windows PE add-on for the Windows ADK using add/remove programs from control panel.
- Install the latest Windows ADK by downloading the Windows ADK 10.1.26100.1 (May 2024) installer, then run adksetup.exe
- Select the option to Install the Windows Assessment and Deployment Kit to this computer and click Next.
- Choose to allow or deny Microsoft to collect the insights for the Windows Kits and click Next.
- Accept the license agreement.
- Ensure Deployment Tools and User State Migration Tool options are selected. You’ll need both for Microsoft Configuration Manager operating system deployment. Click Install.

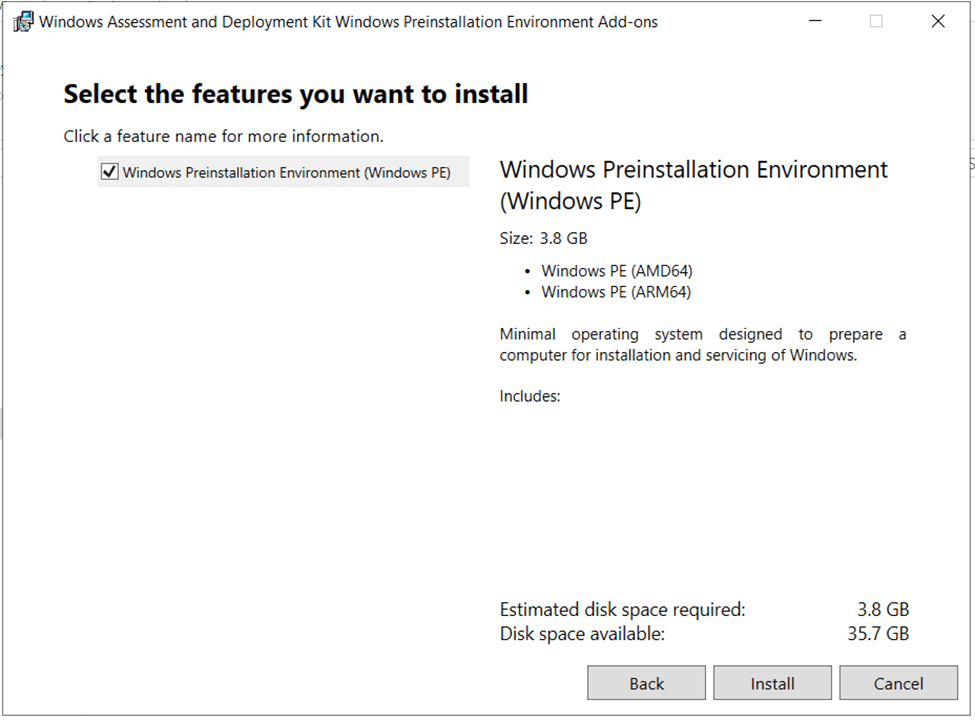
- Install the latest Windows PE add-on for the Windows ADK by downloading the Windows PE add-on for the Windows ADK 10.1.26100.1 (May 2024) installer and running adkwinpesetup.exe
- Select the option to Install the Windows Assessment and Deployment Kit Windows Preinstallation Environment Add-Ons to this computer and click Next.
- Choose to allow or deny Microsoft to collect the insights for the Windows Kits and click Next.
- Accept the license agreement.
- The only feature option for the WinPE add-on is Windows Preinstallation Environment (Windows PE). Ensure it is selected, then click Install.
After installing the latest Windows PE add-on for the Windows ADK, you’ll need to update the WinPE images in Configuration Manager with the latest image version. To do this, perform the following steps:
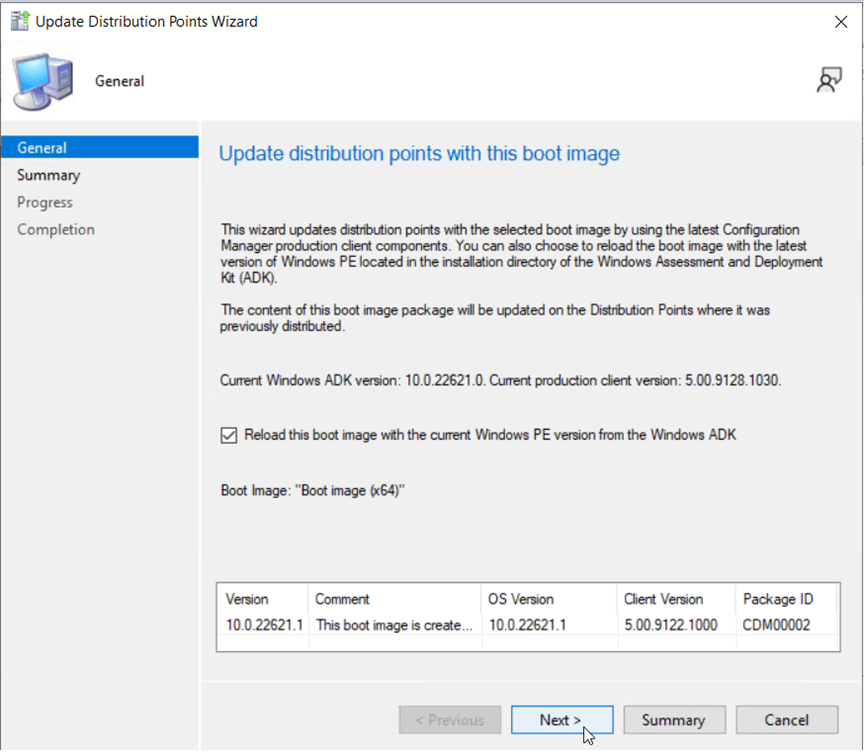
- From the Configuration Manager console, Software Library > Operating Systems > Boot Images. Right-click on Boot Image (x64) and click Update Distribution Points.
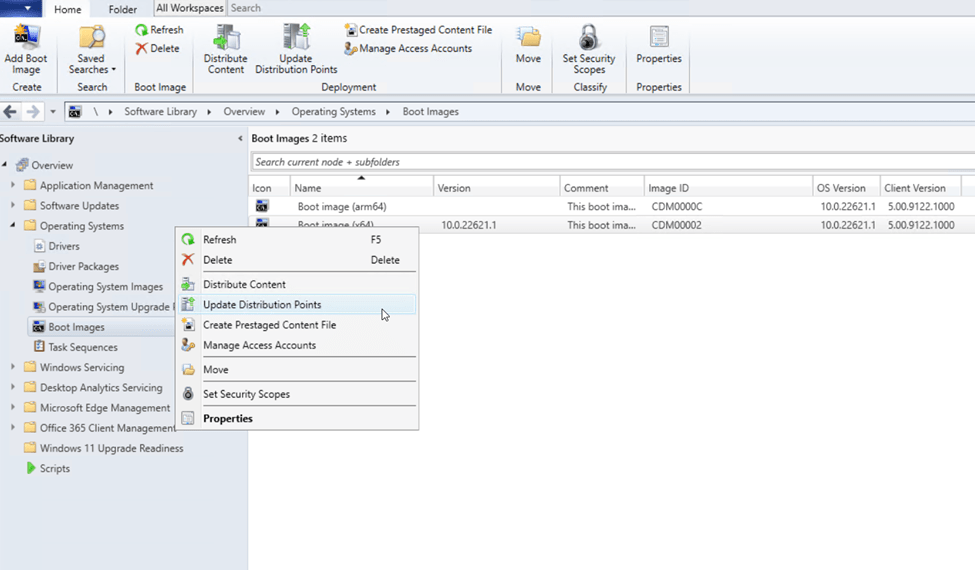
- Select the checkbox Reload this boot image with the current Windows PE version from the Windows ADK, then click Next.
Validating Windows 10 Client Upgrade Readiness (Using Built-In Tooling)
Now that the Configuration Manager site architecture is capable of deploying Windows 11 upgrades via task sequences, we need to validate that our existing Windows 10 client hardware will support the upgrade to Windows 11. Windows 11 is the most secure by default version of Windows yet. As such, some additional hardware requirements, such as a TPM 2.0 chipsets are necessary. Thankfully, there are built-in tools in Configuration Manager that can automatically test enrolled Windows 10 devices and report back their hardware upgrade readiness status.
- First, ensure clients are reporting hardware inventory information by verifying client settings in the Configuration Manager console: Administration > Client Settings
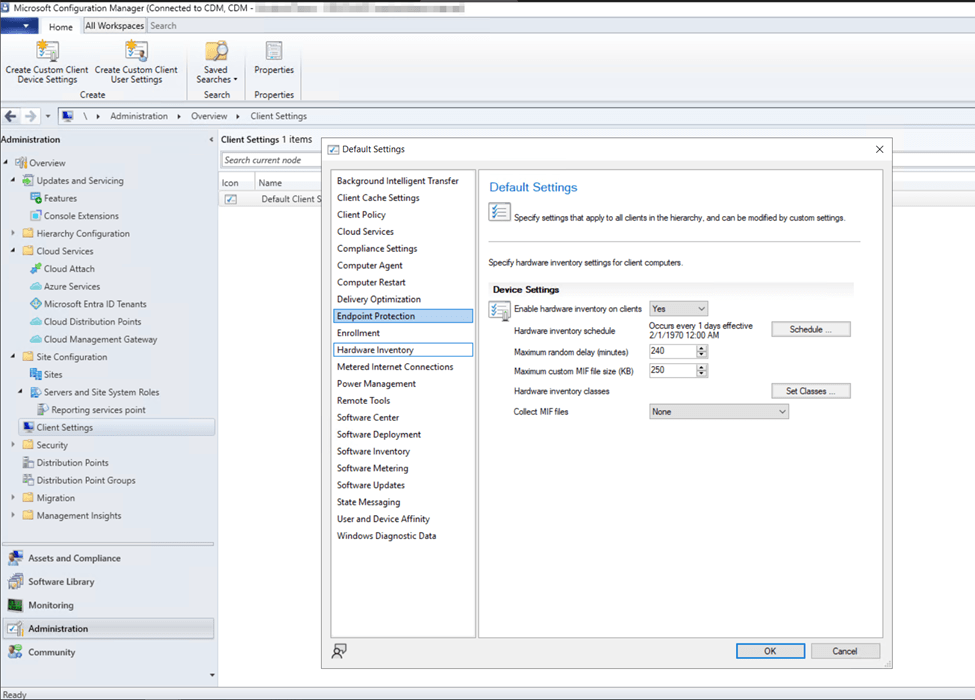
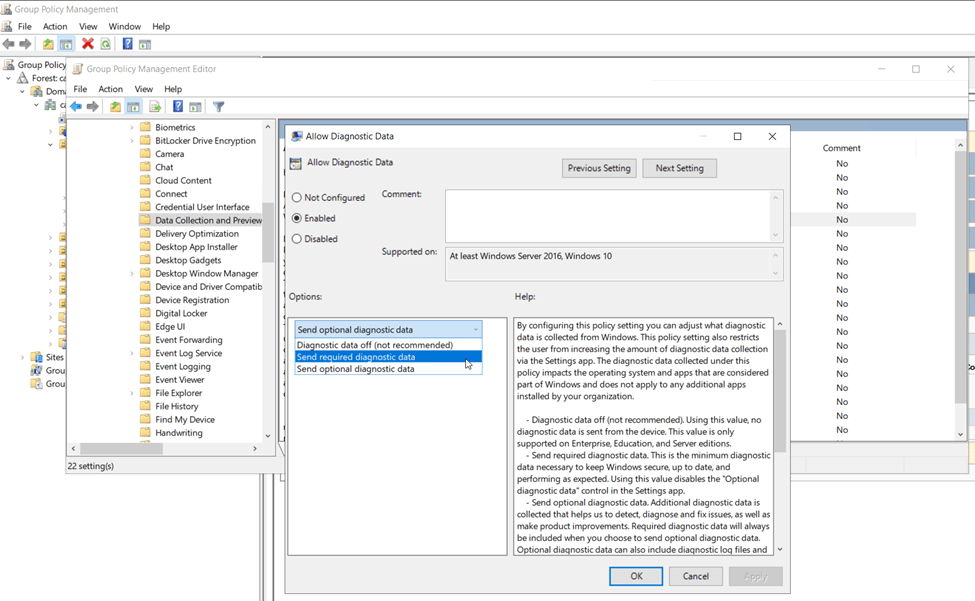
- If Windows 10 clients are not already configured to provide at least basic telemetry, use Active Directory domain-based group policy to enable at scale. Computer Configuration > Policies > Administrative Templates > Windows Components > Data Collection and Preview Builds > Allow Diagnostic Data > Allow Diagnostic Data. Configure value as “Send required diagnostic data” or “Send optional diagnostic data”
- There is a scheduled task on the Windows 10 endpoints named “Microsoft Compatibility Appraiser” that will need to run prior to the Configuration Manager hardware inventory action. Verify on your Windows 10 endpoints that this task is created and has recently run. Open Task Scheduler and scroll through the Task Status list until you find the Microsoft Compatibility Appraiser task. Alternatively, you can also find this task under the folder: Task Scheduler Library\Microsoft\Windows\Application Experience. Validate a recent, successful run.
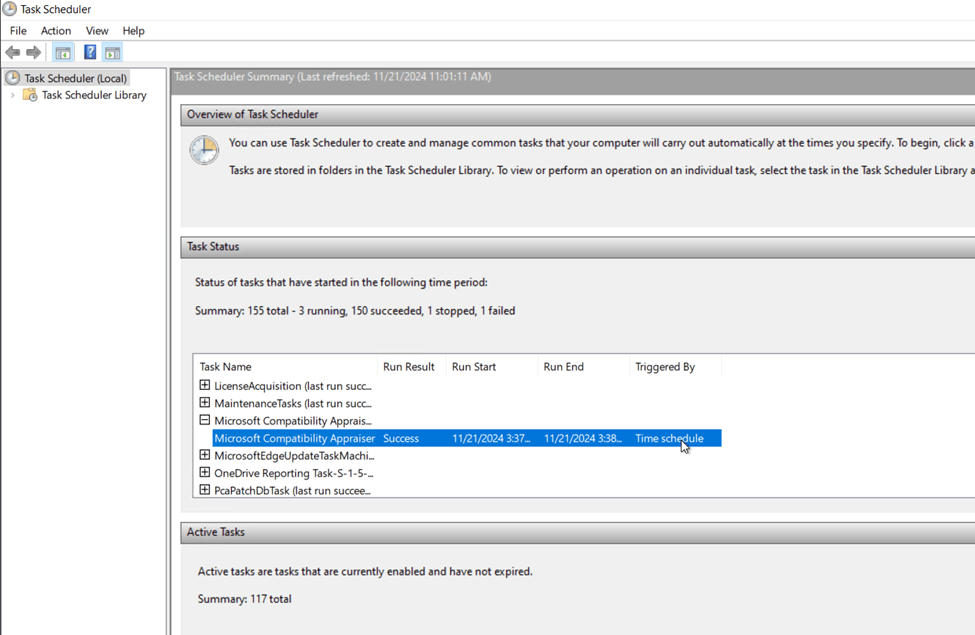
- The Compatibility Appraiser will populate the registry key: HKEY_LOCAL_MACHINE\SOFTWARE\Microsoft\Windows NT\CurrentVersion\AppCompatFlags\CompatMarkers with compatibility information. The Hardware Inventory cycle action from the Configuration Manager agent will collect this data and will populate the device information in the Configuration Manager database.
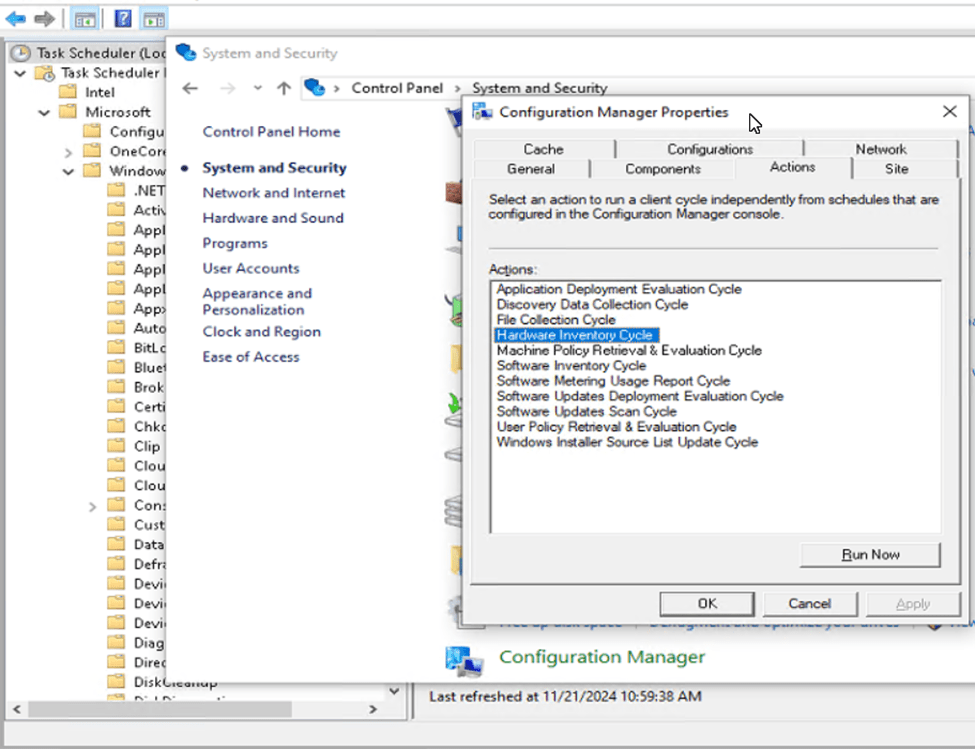
- Ensure a recent Hardware Inventory cycle action has run on the client device. This can be triggered from the client by opening Control Panel > System & Security > Configuration Manager. Then navigate to the Actions tab, select Hardware Inventory Cycle and click Run Now
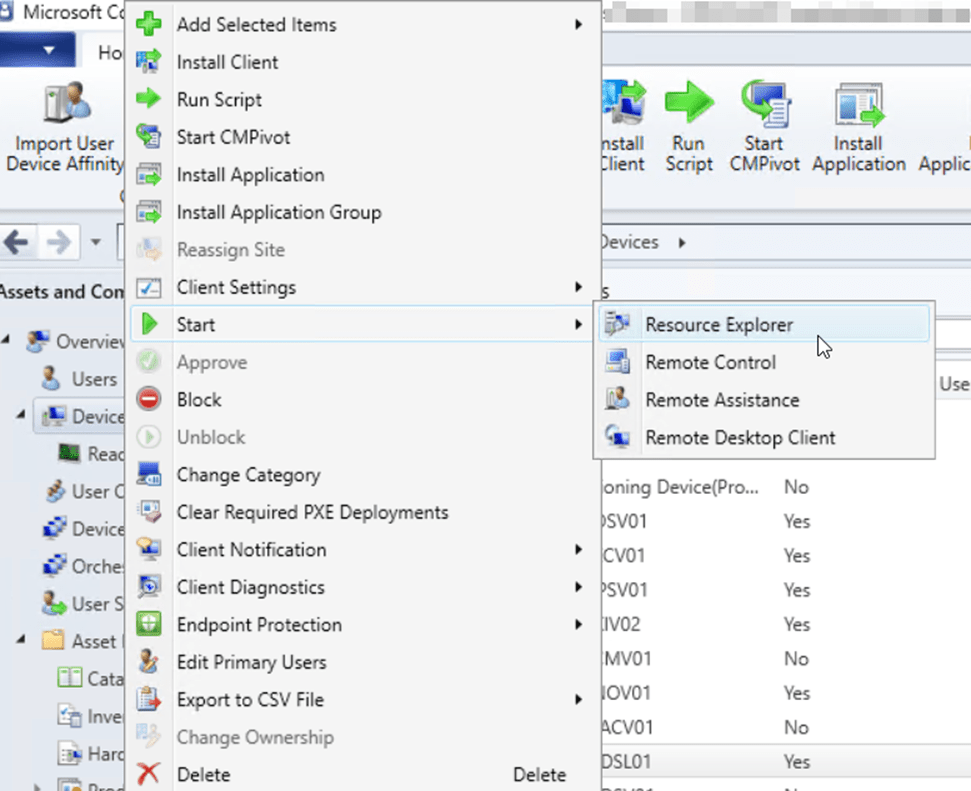
- You can view the upgrade compatibility data for any single Windows 10 device by navigating to the device in the Configuration Manager console, right-clicking the device and selecting Start > Resource Explorer.
- From here, expand the Hardware folder, then select UPGRADE_EXPERIENCE_INDICATORS to view the results of each individual check.
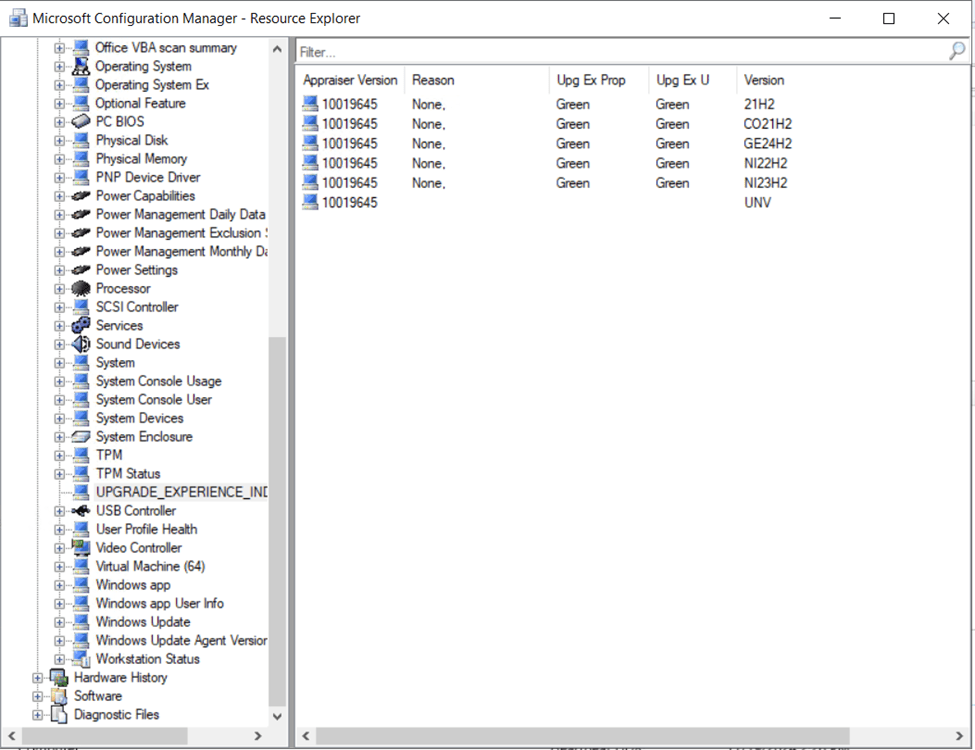
Multiple versions of Windows 10/11 are checked for compatibility. Here’s a table to help you make sense of the cryptic values (the values are built off the Windows build codenames):
| 21H2 | Windows 10 21H2 |
| CO21H2 | Windows 11 21H2 (Cobalt) |
| NI22H2 | Windows 11 22H2 (Nickel) |
| NI23H2 | Windows 11 23H2 (Nickel) |
| GE24H2 | Windows 11 24H2 (Germanium) |
The upgrade experience markers (Upg Ex Prop & Upg Ex U) will indicate a color based on the readiness state of the device to upgrade to that particular version of Windows 11. Green means the device is capable of upgrading to that specific version with no issues. Here’s a link to the official doc’s article from Microsoft that speaks to the color indicators as well as what tests cause certain color indicators to display: https://learn.microsoft.com/en-us/mem/configmgr/osd/deploy-use/manage-windows-11-readiness-dashboard#upgrade-experience-marker
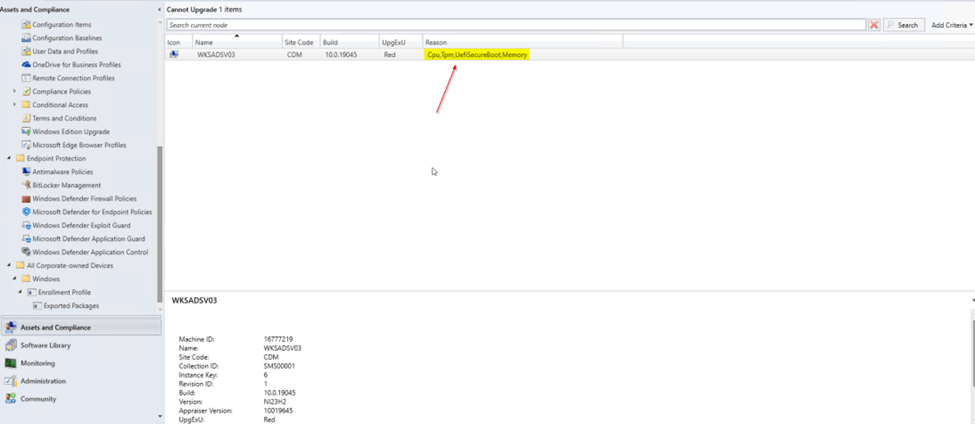
If a device fails any of the readiness checks, in addition to an experience marker color showing as orange or red, there should also be more details on what exactly failed in the Reason column. While using resource explorer to view the upgrade readiness of a single device is convenient, it’s not practical for the enterprise. For enterprise-level reporting, the Windows 11 Upgrade Readiness dashboard exists.
Use the Windows 11 Readiness Dashboard found in the Configuration Manager console under Software Library > Windows 11 Upgrade Readiness to view the readiness state of all Windows 10 devices in the environment.

From the Upgrade Experience Indicators chart, you can drill into devices that are reporting unable to upgrade. The Reason column will indicate why the upgrade readiness checks have failed.
Configuring a Site for Windows 11 Upgrade Deployment
In addition to reports and dashboard, we need an actionable device collection that contains all the Windows 10 clients ready for upgrade to Windows 11 to target. To accomplish this, I’ll build two device collections. One that will contain all Windows 10 clients, and the other will contain only the Windows 10 clients ready to upgrade to Windows 11.
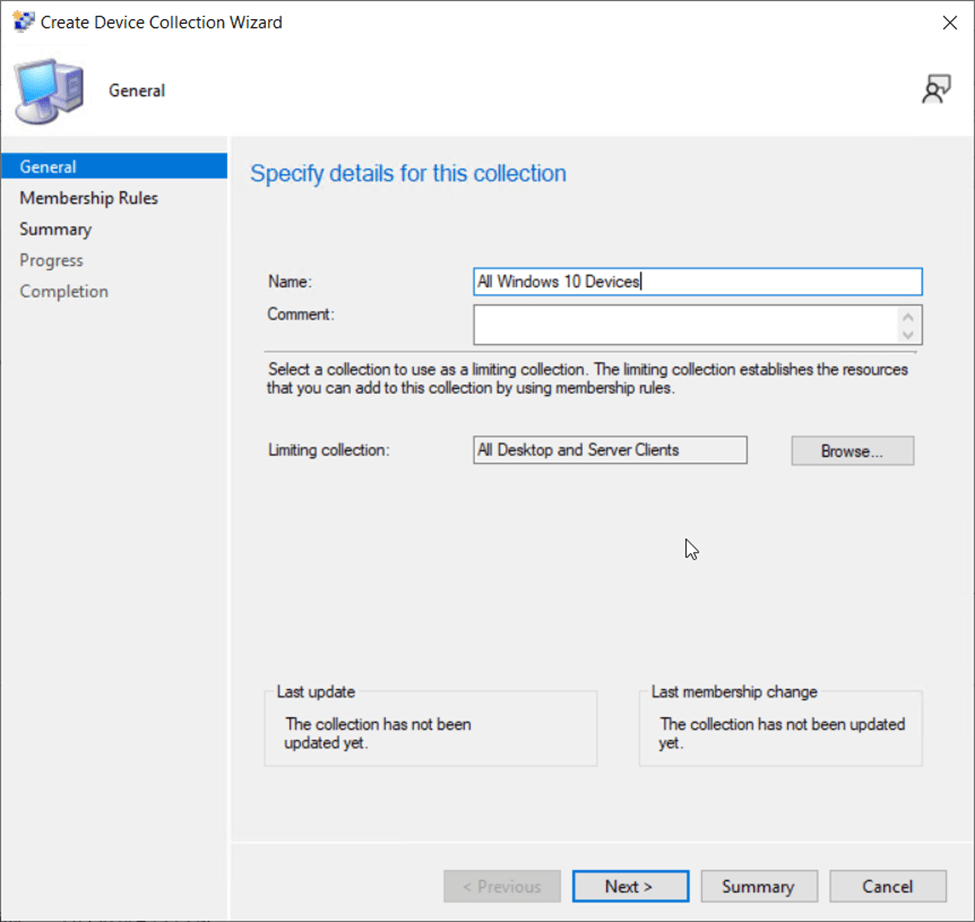
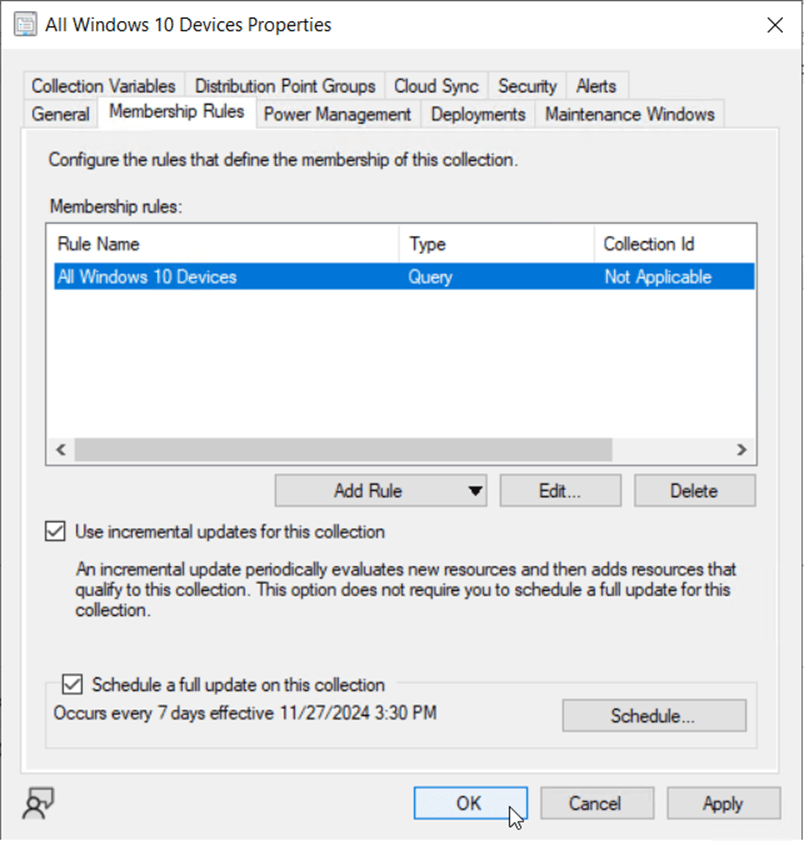
Creating an “All Windows 10 Devices” Collection
- From the Configuration Manager console, navigate to Assets and Compliance > Device Collections.
- Click Create Device Collection from the menu bar.
- Specify a Name and Comment. Choose a limiting collection such as “All Desktop and Server Clients” then click Next.
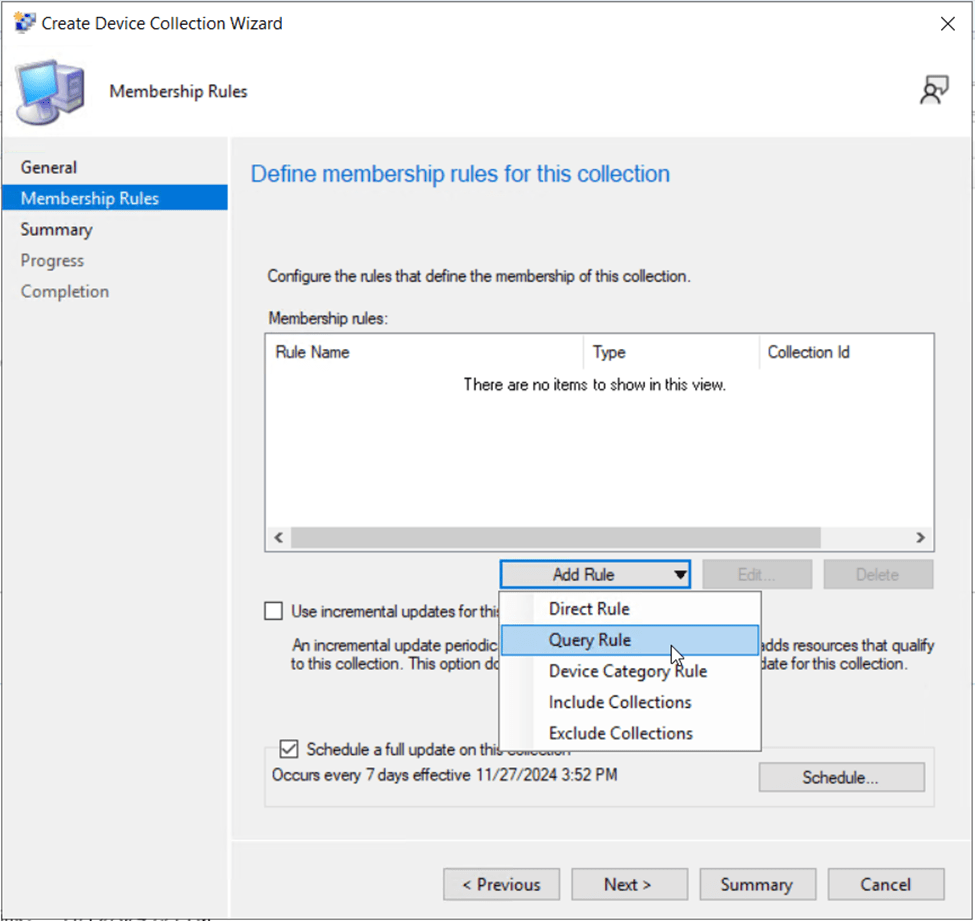
- On the Membership Rules page, choose Add Rule, then Query Rule.
- Provide a name for the query such as “All Windows 10 Devices”, then click Edit Query Statement.
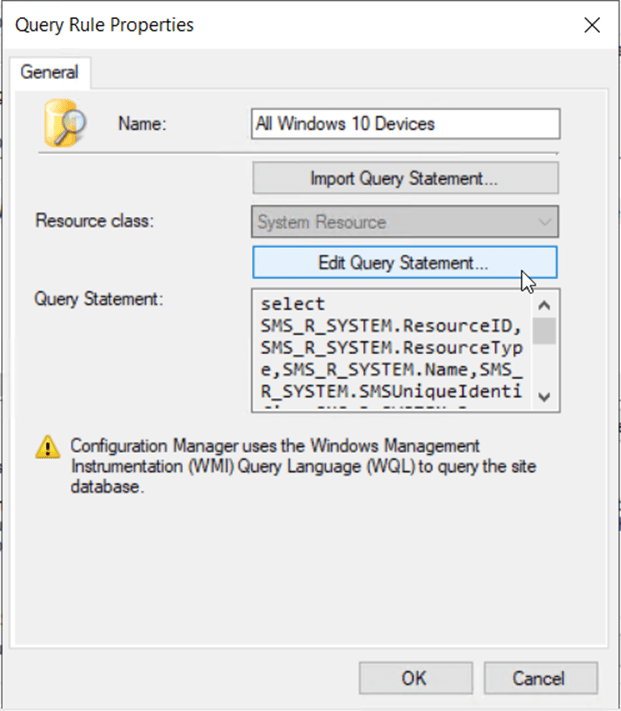
- Click the Show Query Language button.
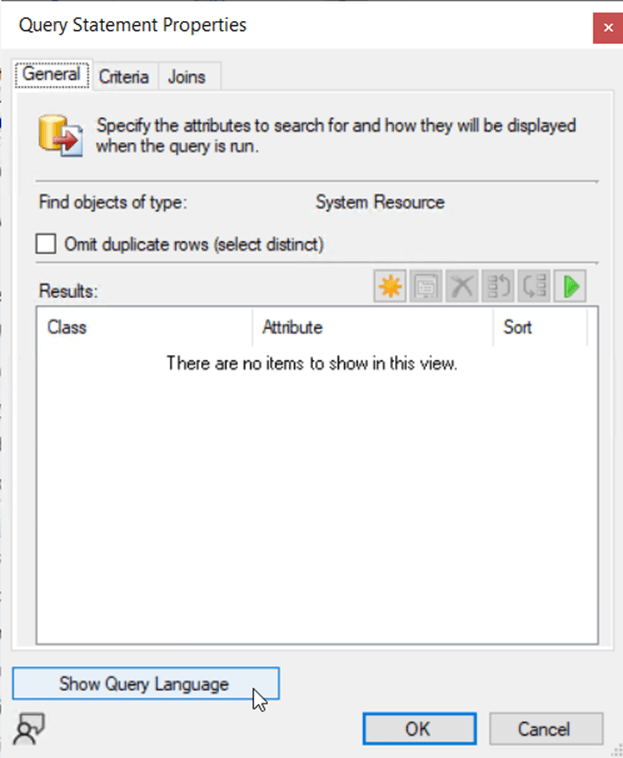
- Erase any existing query statements and populate with the following:
select SMS_R_SYSTEM.ResourceID,SMS_R_SYSTEM.ResourceType,SMS_R_SYSTEM.Name,SMS_R_SYSTEM.SMSUniqueIdentifier,SMS_R_SYSTEM.ResourceDomainORWorkgroup,SMS_R_SYSTEM.Client from SMS_R_System inner join SMS_G_System_OPERATING_SYSTEM on SMS_G_System_OPERATING_SYSTEM.ResourceId = SMS_R_System.ResourceId where SMS_G_System_OPERATING_SYSTEM.Name like "%Windows 10%"- Click OK to close the statement query window.
- Click OK to close the query rule properties window.
- Ensure the option for Use incremental updates for this collection is selected, then click OK to save and close the new device collection.
Now that we have a device collection that contains all Windows 10 clients, let’s create another device collection that contains ONLY the Windows 10 devices ready for upgrade to Windows 11 23H2.
Creating a “Devices Ready to Upgrade to Windows 11 23H2” Collection
- From the Configuration Manager console, navigate to Assets and Compliance > Device Collections.
- Click Create Device Collection from the menu bar.
- Specify a Name (Clients Ready for Upgrade to Windows 11 23H2) and Comment. Choose a limiting collection of All Windows 10 Devices (collection we just created in previous steps) then click Next.
- On the Membership Rules page, choose Add Rule, then Query Rule.

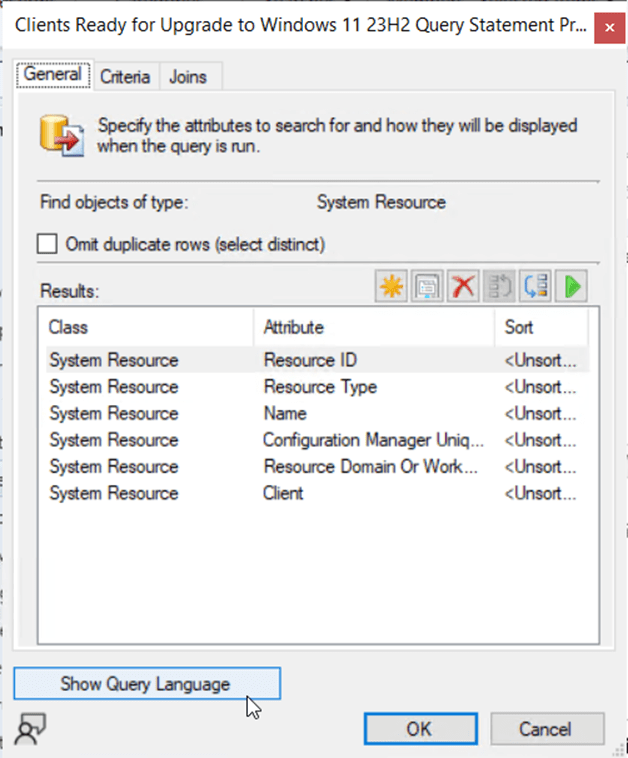
- Provide a name for the query such as “Devices Ready to Upgrade to Windows 11”, then click Edit Query Statement.
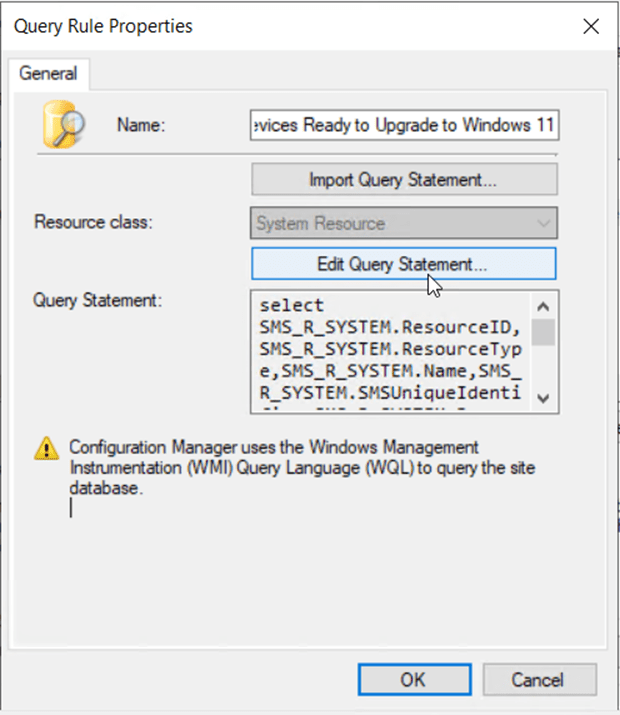
- Click the Show Query Language button.
- Erase any existing query statements and populate with the following:
select SMS_R_SYSTEM.ResourceID,SMS_R_SYSTEM.ResourceType,SMS_R_SYSTEM.Name,SMS_R_SYSTEM.SMSUniqueIdentifier,SMS_R_SYSTEM.ResourceDomainORWorkgroup,SMS_R_SYSTEM.Client from SMS_R_System inner join SMS_G_System_UPGRADE_EXPERIENCE_INDICATORS on SMS_G_System_UPGRADE_EXPERIENCE_INDICATORS.ResourceID = SMS_R_System.ResourceId where SMS_G_System_UPGRADE_EXPERIENCE_INDICATORS.Version = "NI23H2" and SMS_G_System_UPGRADE_EXPERIENCE_INDICATORS.UpgExU = "Green"- Click OK to close the statement query window.
- Click OK to close the query rule properties window.
- Ensure the option for Use incremental updates for this collection is selected, then click OK to save and close the new device collection.
Validate that the dynamic device collection of devices ready to upgrade to Windows 11 23H2 matches the Windows 11 Upgrade Readiness Report for devices that have passed the Windows 11 23H2 readiness checks.
Preparing the Windows 11 Setup Files in Configuration Manager
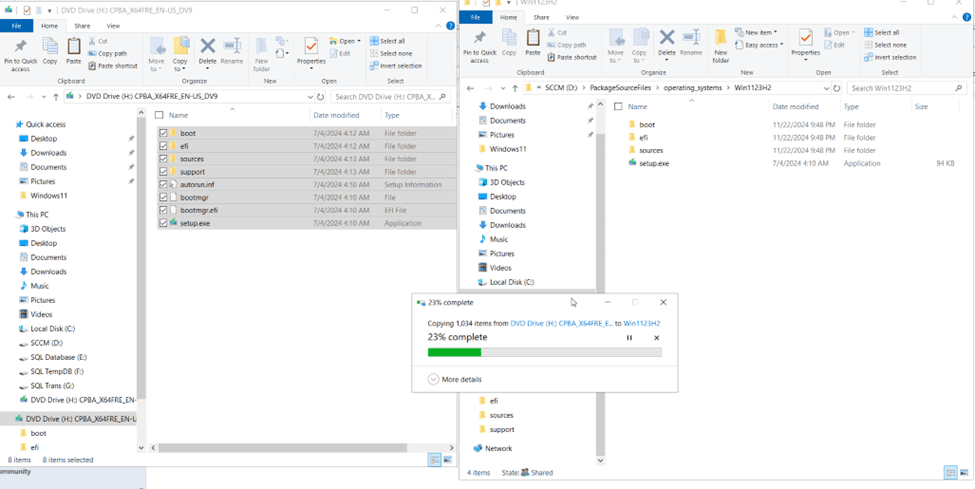
You’ll need to first extract and distribute the setup files from the version of Windows 11 you wish to upgrade to. At the time of this blog post 24H2 is out, but I’ve worked with several customers who have experienced issues with 24H2 so my recommendation would be 23H2 for the time being.
- Mount the Windows 11 23H2 ISO media and extract (copy/paste) all files to a network share accessible to Configuration Manager. In this example, I have a share named “PackageSourceFiles” I will copy the contents of the ISO to.
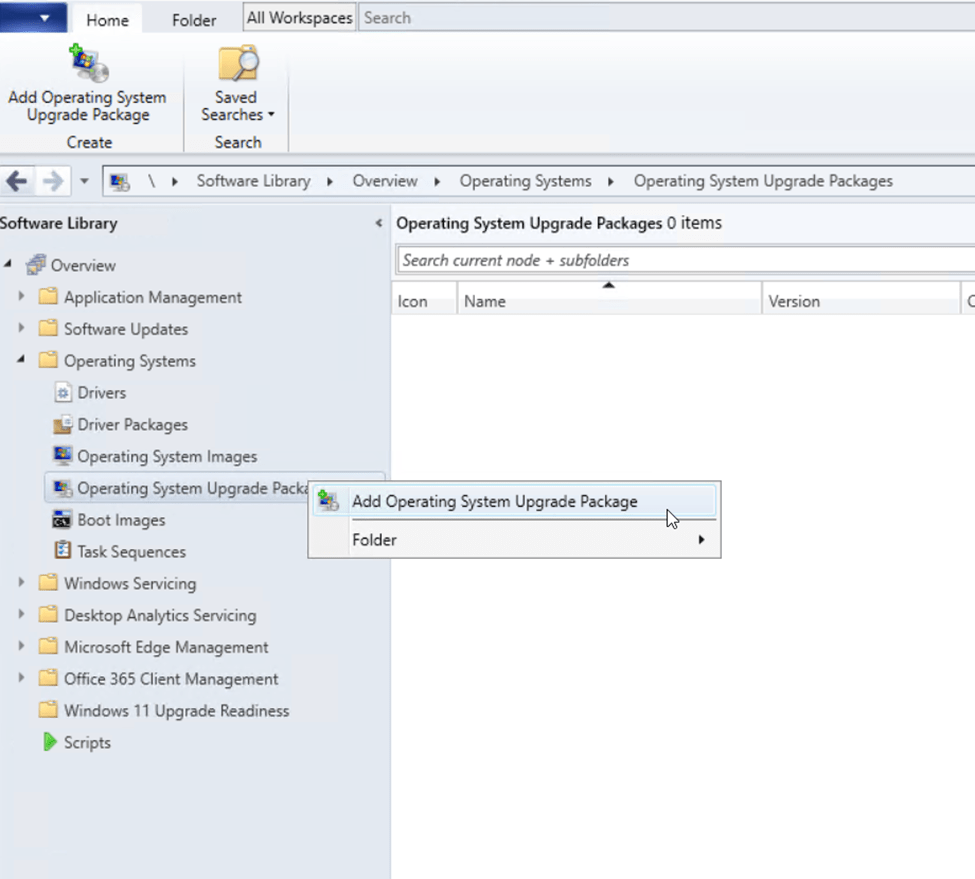
- From the Configuration Manager console, navigate to Software Library > Operating Systems > Operating System Upgrade Packages.
- Either click the Add Operating System Upgrade Package button from the menu bar, or by right-clicking on Operating System Upgrade Packages first.
- From the Add Operating System Upgrade Package Wizard, click Browse, then navigate to the UNC path (make sure it’s a UNC path and not a local path!) of the share where your Windows 11 23H2 installer files are extracted.
- Check the box to accept the licensing agreement.
- Select the option to Extract a specific image index from install.wim file of selected upgrade package, then choose the edition of Windows 11 you are licensed for. In this case, I’m using subscription activation for my Windows 11 Enterprise benefits so I will choose Windows 11 Pro and allow subscription activation to automatically upgrade after deployment.
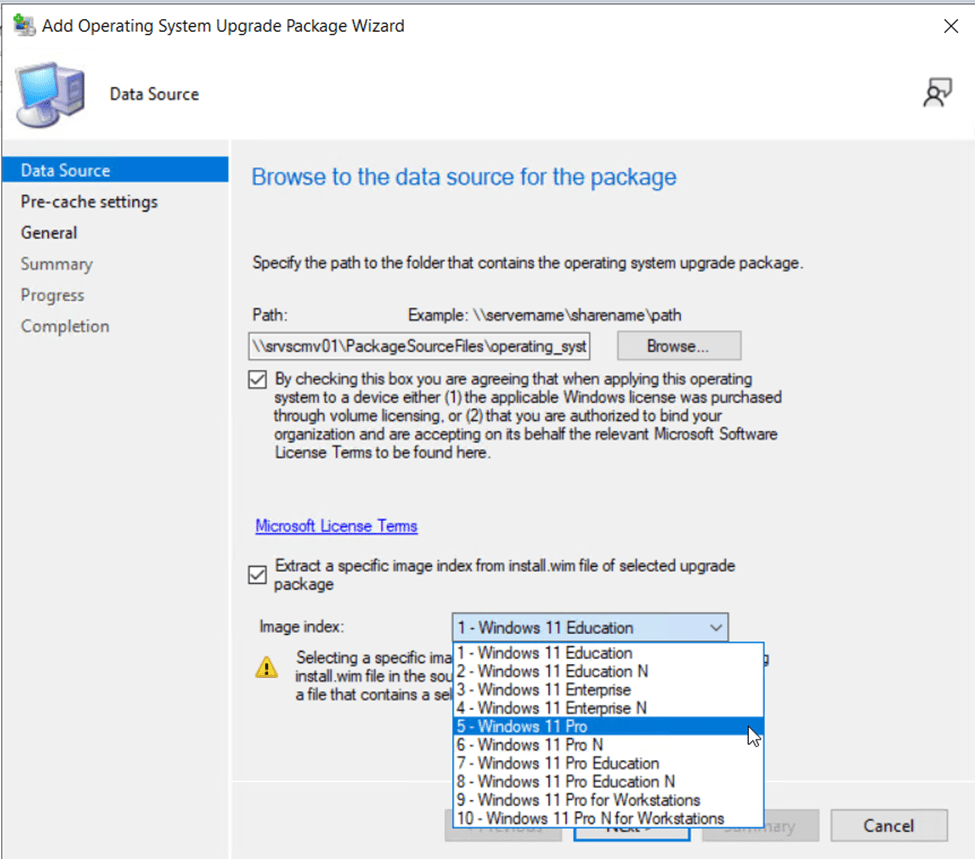
- Click Next to continue.
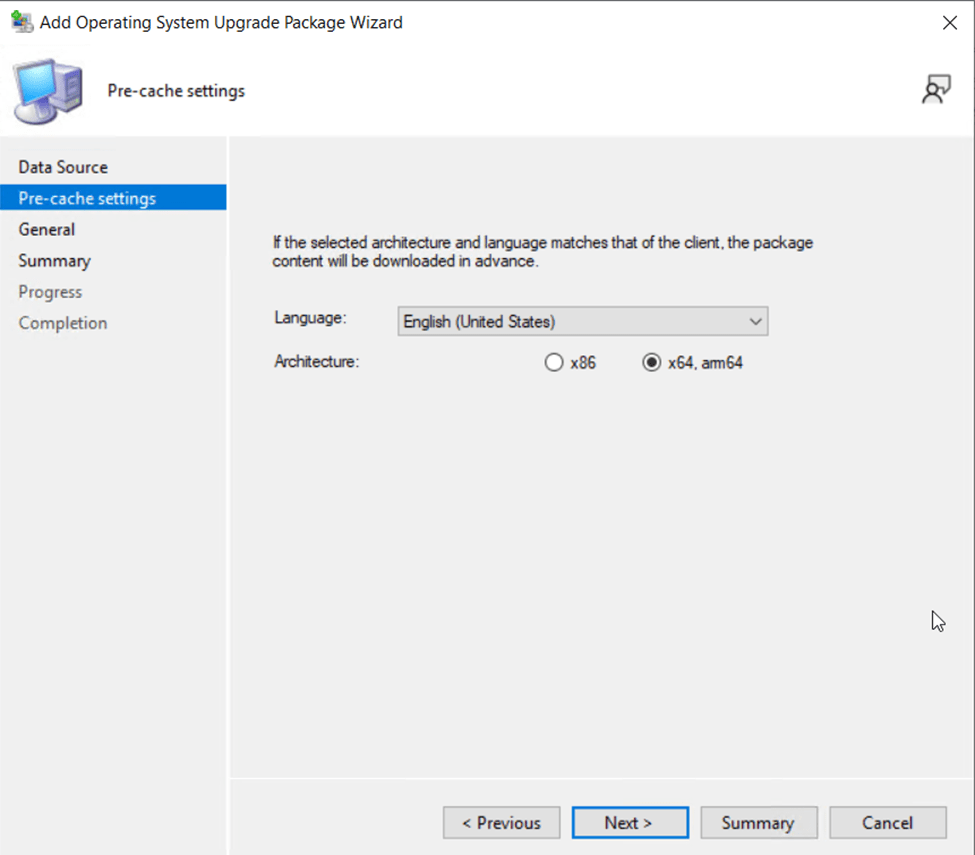
- Select a Language and OS Architecture, then select Next.
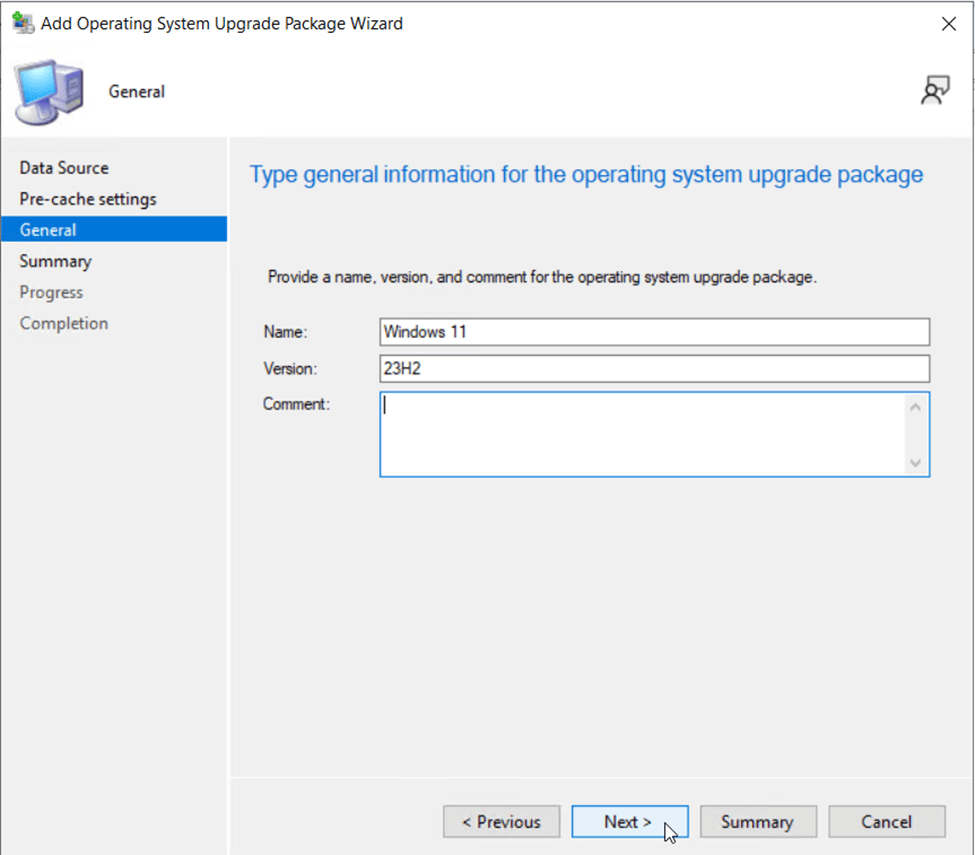
- Provide a Name, Version and Comment (as necessary), then click Next to continue.
- On the summary page, verify your settings then click Next.
- Wait for the upgrade package to import successfully, then Close the wizard.
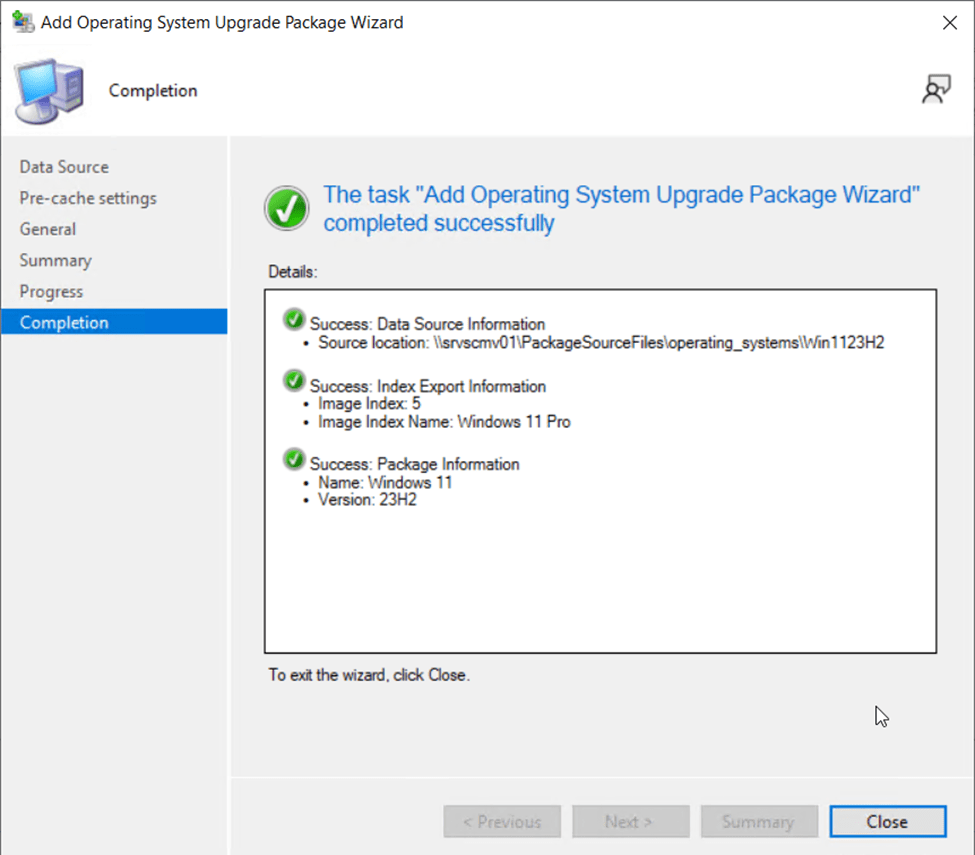
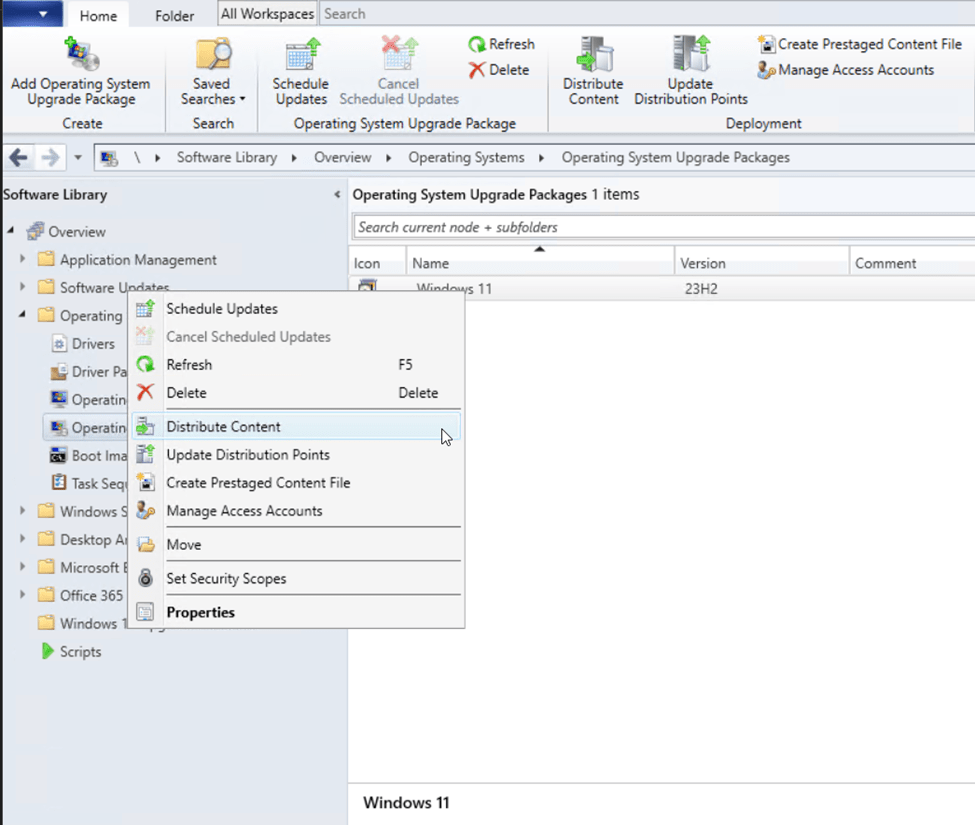
- Right-click the newly created operating system upgrade package, then select Distribute Content to deploy the bits to your distribution points.
- Add you distribution point groups and/or distribution points where the Windows 11 upgrade content should be deployed for client access. Click Next when finished.
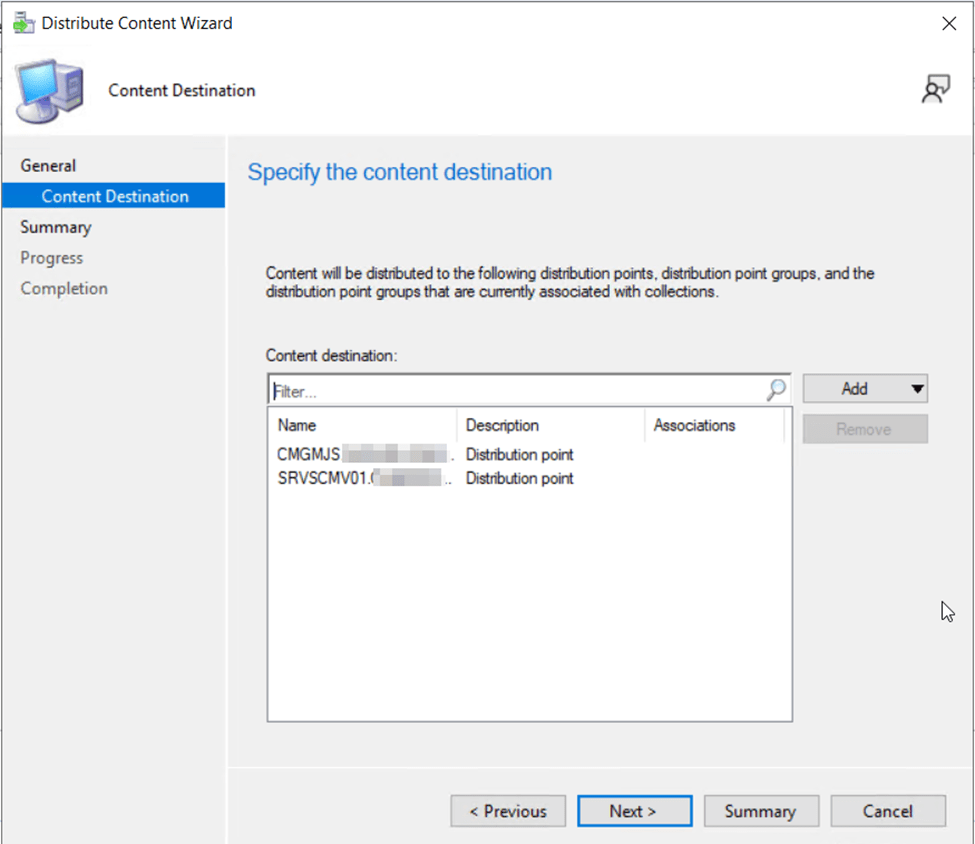
- Confirm the settings, then click Next and wait for the wizard to complete the assignment. Click Close. Wait for the distribution points to receive the content before proceeding to the next step.
Create a Task Sequence for User-Driven Upgrade to Windows 11
Based on my experience, it’s often best to start a migration to Windows 11 with end users who are early technology adopters and get excited about being part of a new technology experience. For this reason, we will create a task sequence that will be assigned to users as available for installation via Software Center. This gives those early technology adopters, and tech enthusiasts, a chance to self-service their upgrade to Windows 11 on their own timeline.
Most organizations keep the upgrade rollout in an optional mode for users for several weeks/months giving users the option to self-service the update on their own timeline. For the users that delay the upgrade, we will eventually make the upgrade forced by moving the task sequence assignment to required, after appropriate communication to users regarding impact.
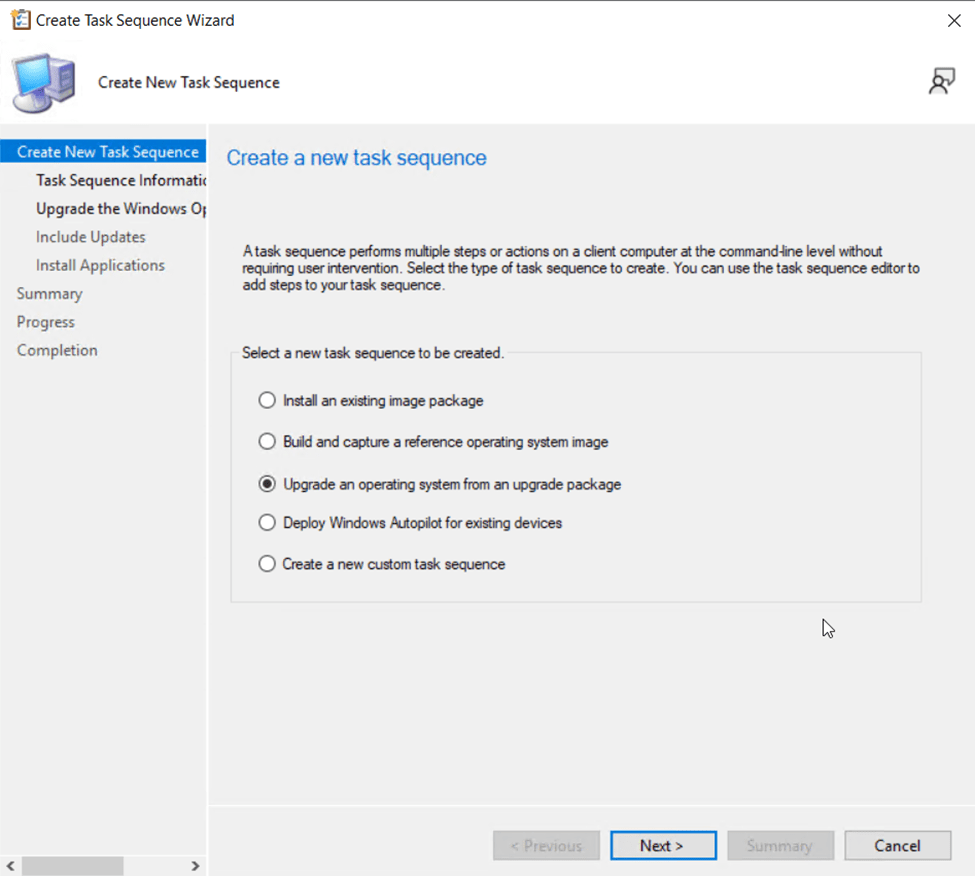
- From the Configuration Manager console, navigate to Software Library > Operating Systems > Task Sequences.
- Click the Create Task Sequence button on the navigation bar.
- Select the option to Upgrade an operating system from an upgrade package, then click Next.
- Give the task sequence an appropriate name and description, then click Next.
- On the Select an operating system upgrade package page, click the Browse button, then select the Operating System Upgrade Package we previously imported. Ensure the Edition index is displaying the version of Windows 11 we intend to upgrade to. Click Next.
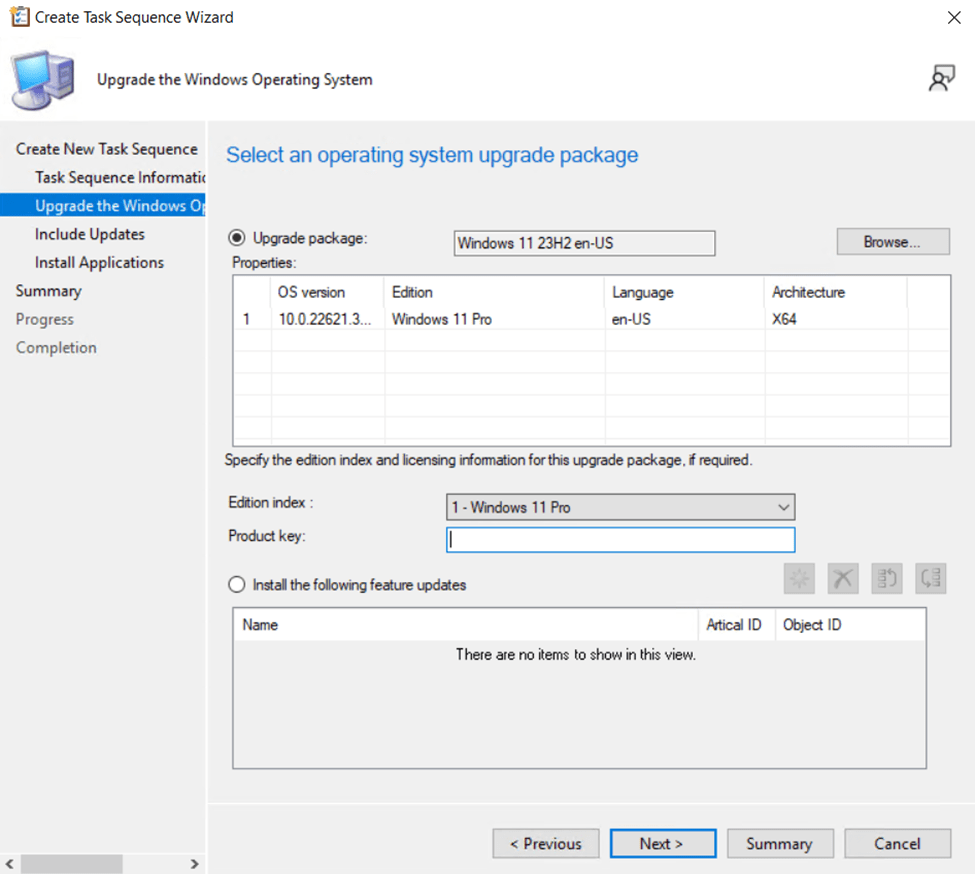
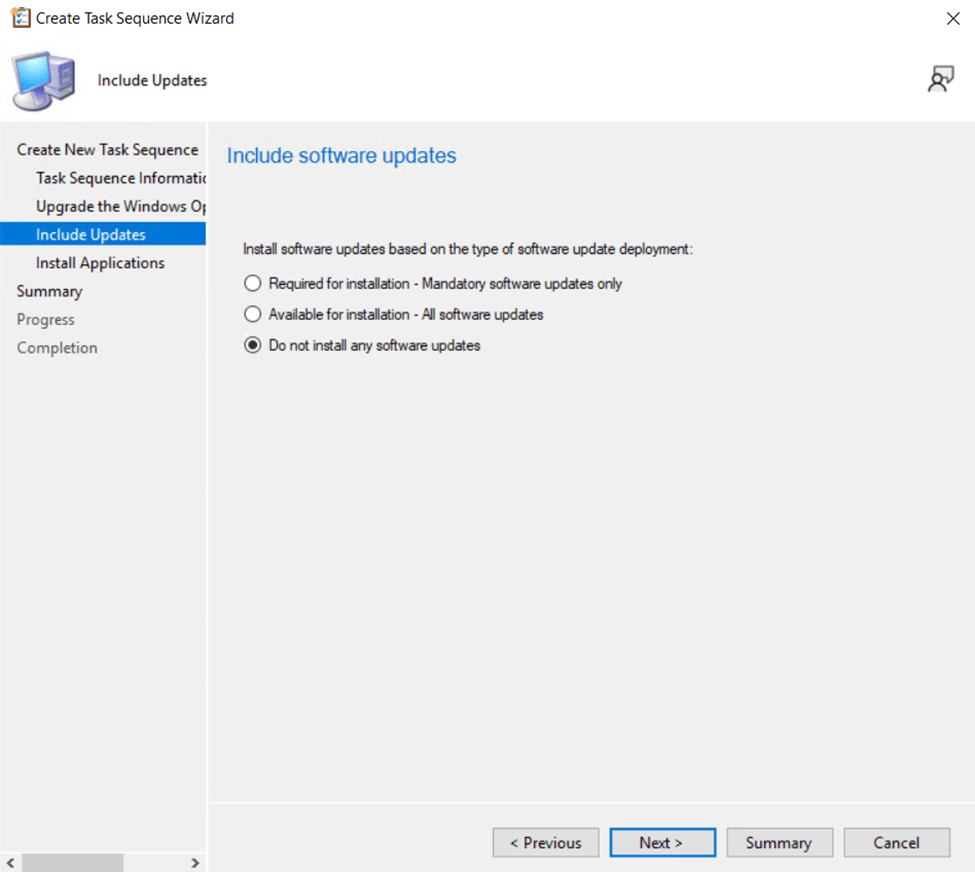
- On the Include Software Updates page, select an appropriate action for how to apply Windows Updates during the upgrade process. Options are as follows:
- Require for installation – Mandatory software updates only – only software updates already published in Configuration Manager that target collections this device is a member of and that have reached the deadline for installation will be installed.
- Available for installation – All software updates – All software updates already published in Configuration Manager that target collections this device is a member of regardless of whether the updates have reached the deadline for installation will be installed.
- Do not install any software updates – No software updates will be installed during the upgrade process.
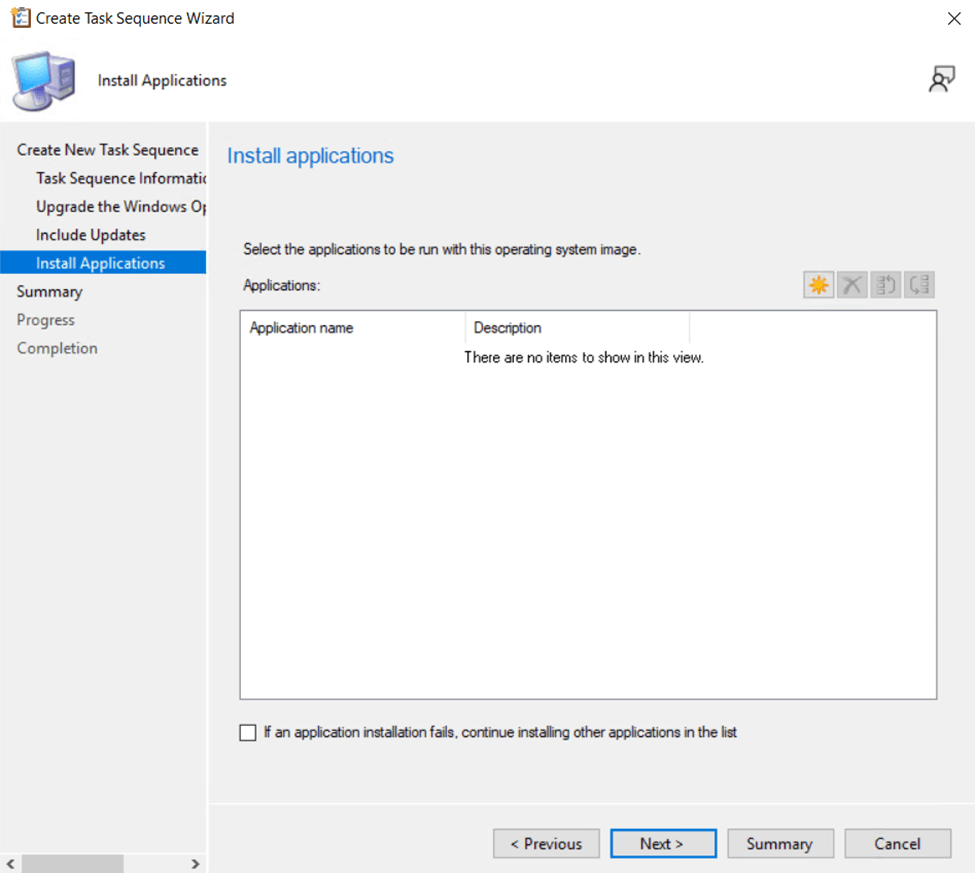
- On the Install Applications page of the wizard, select any New applications that should be installed during the upgrade process. Existing applications that are already installed on the client will remain. Click Next to proceed to the summary screen.
- Review the configuration settings you’ve made on the summary screen, then click Next to finish the creation of the upgrade task sequence.
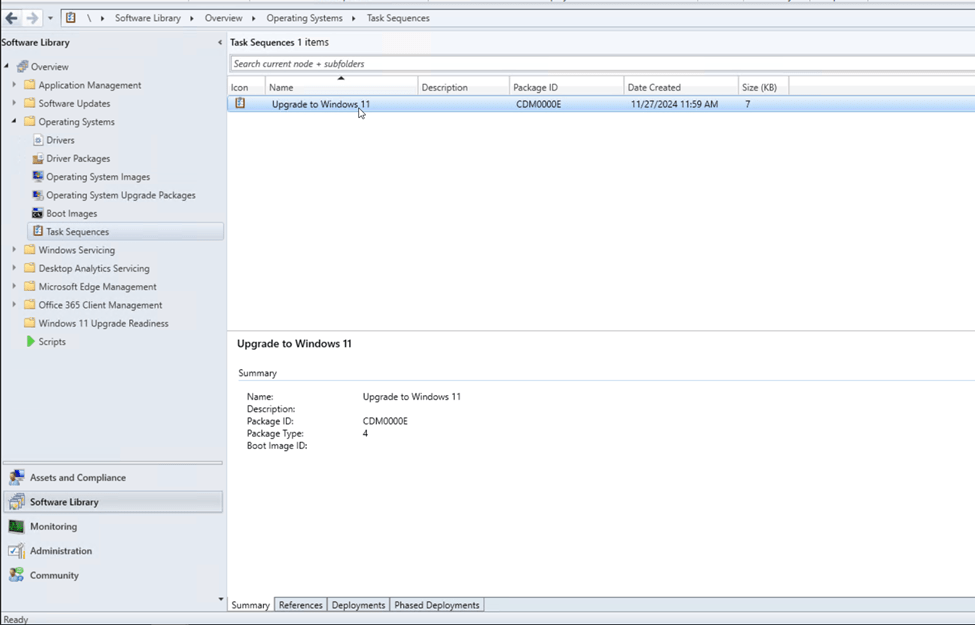
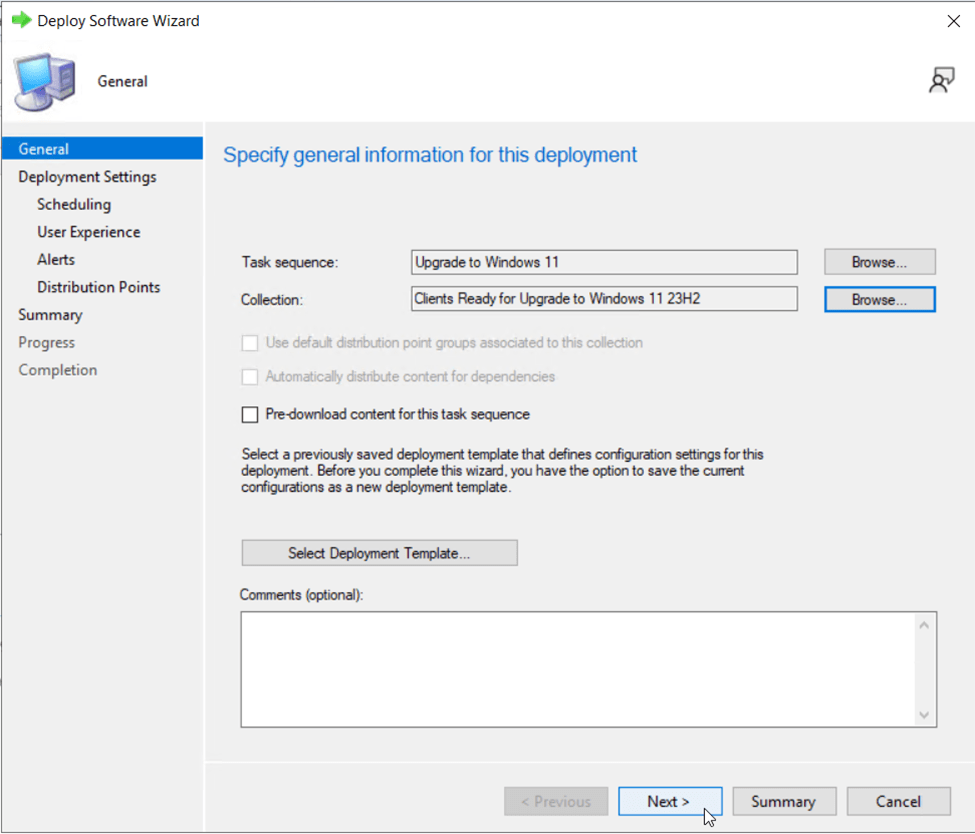
- Now we will create the deployment for the Windows 11 upgrade task sequence that advertises the update to our users in Software Center… From the Configuration Manager Console, Software Library > Operating Systems > Task Sequences. Select the Upgrade to Windows 11 task sequence previously created.
- Click Deploy from the actions in the ribbon bar.
- On the general tab of the deployment wizard, select the previously created device collection Clients Ready for Upgrade to Windows 11 23H2, then click Next.
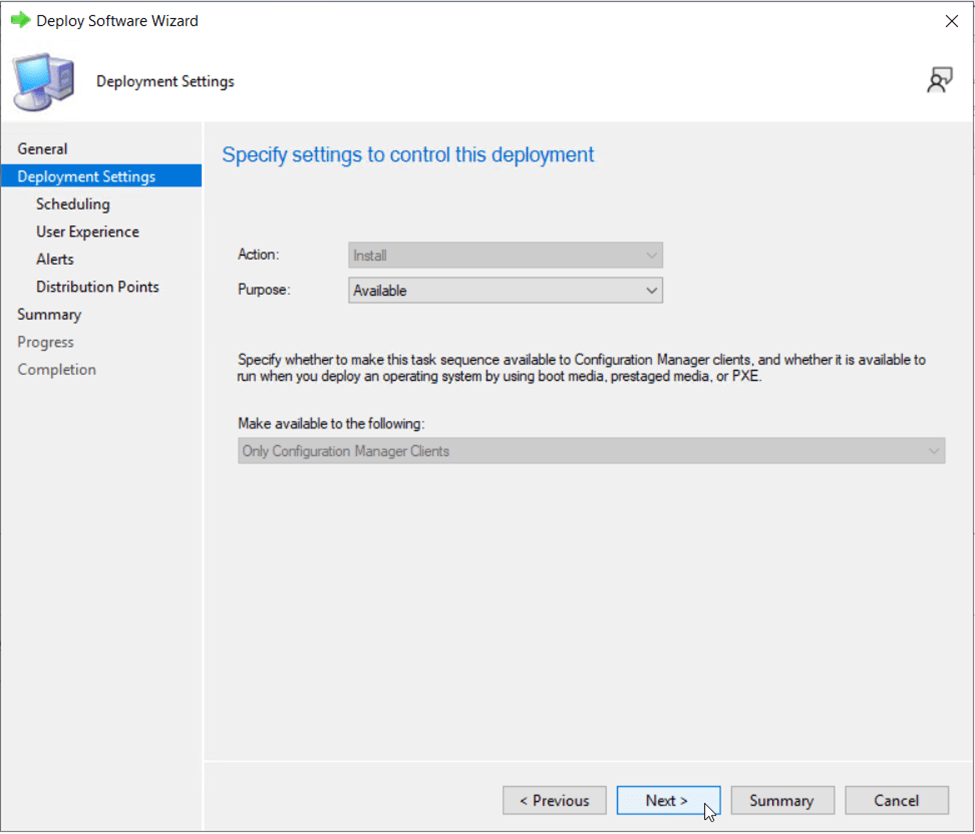
- On the first deployment settings page, leave the Purpose set to Available, then click Next.
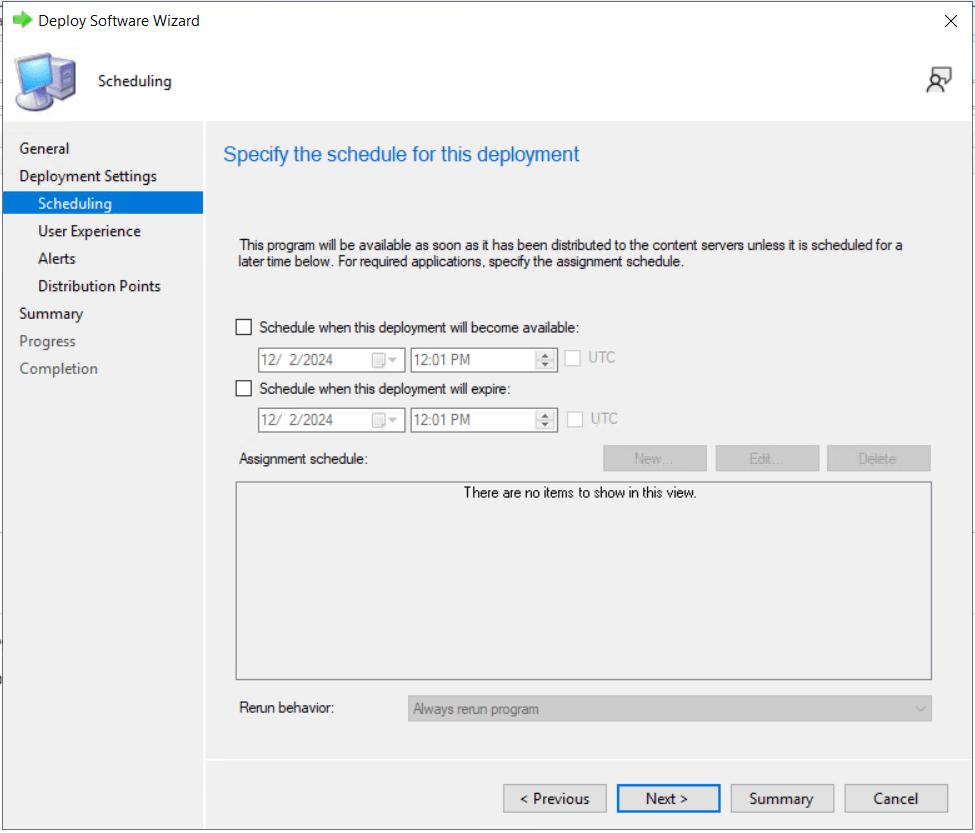
- On the deployment scheduling tab, specify a date to make the upgrade available, or leave the boxes de-selected if you are ready to advertise the task sequence to users immediately. Click Next.
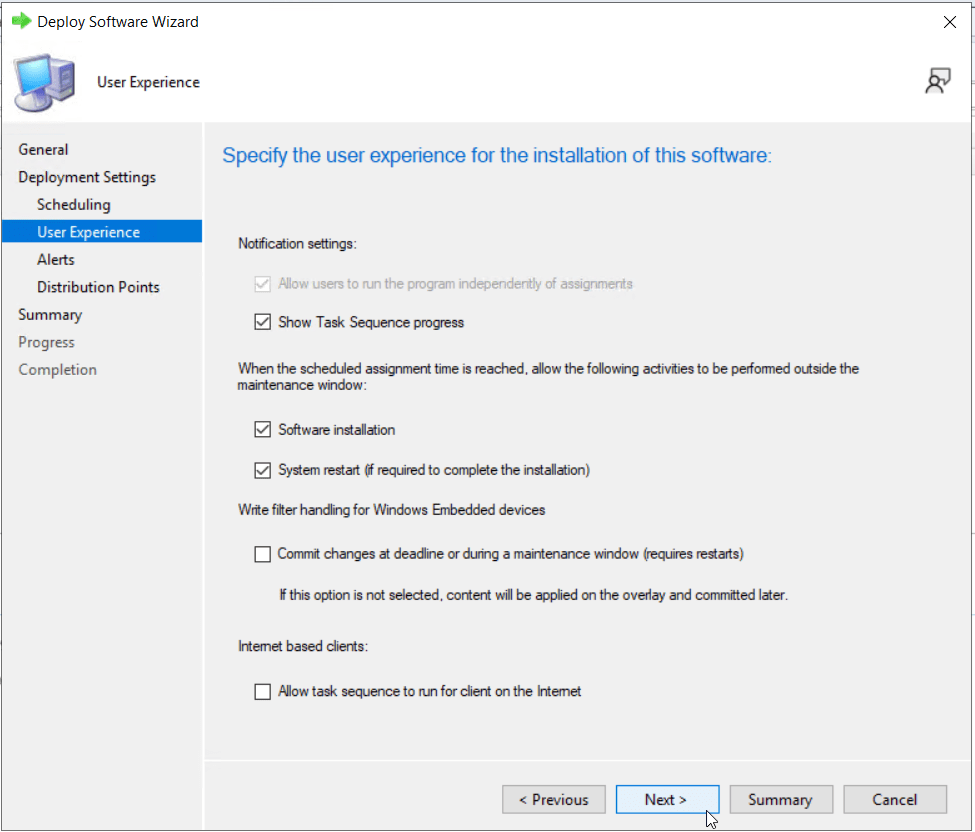
- On the user experience tab, select the various options for the experience you desired for your user base. I choose to display the task sequence progress for users and allow the deployment to perform software installation and system restarts outside maintenance windows as the user will already be choosing a convenient date/time for installation when they click and run the upgrade task sequence. Click Next.
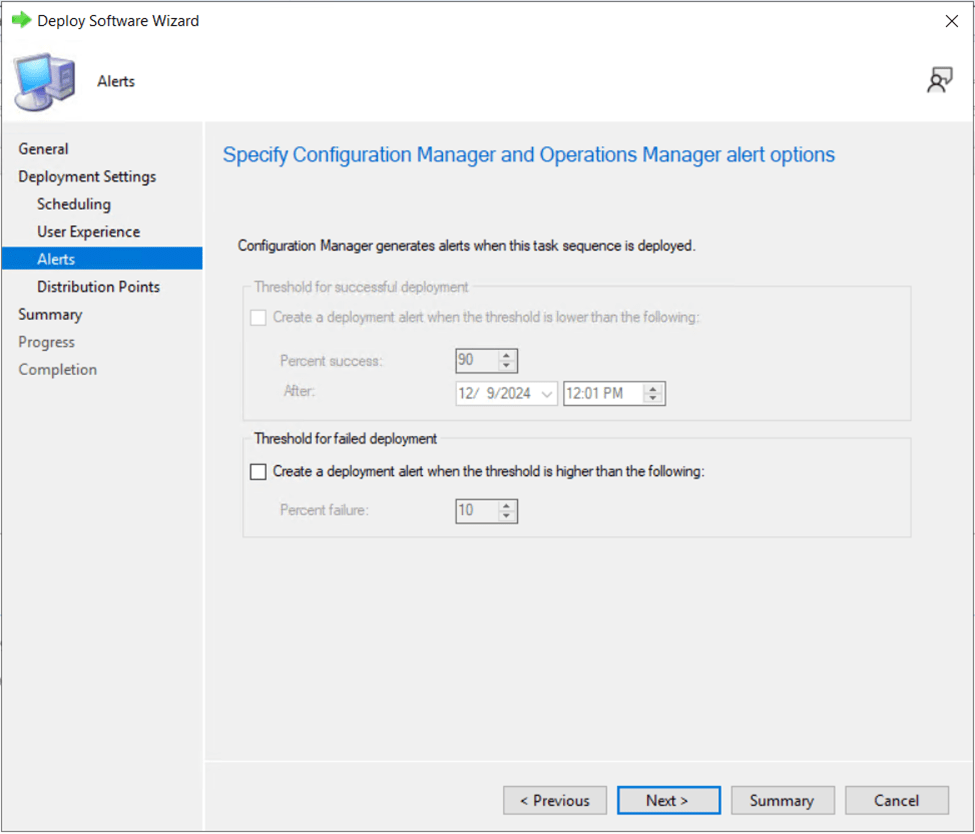
- On the alerts tab, select any desired option for an alert based on a deployment failure threshold percentage. Click Next.
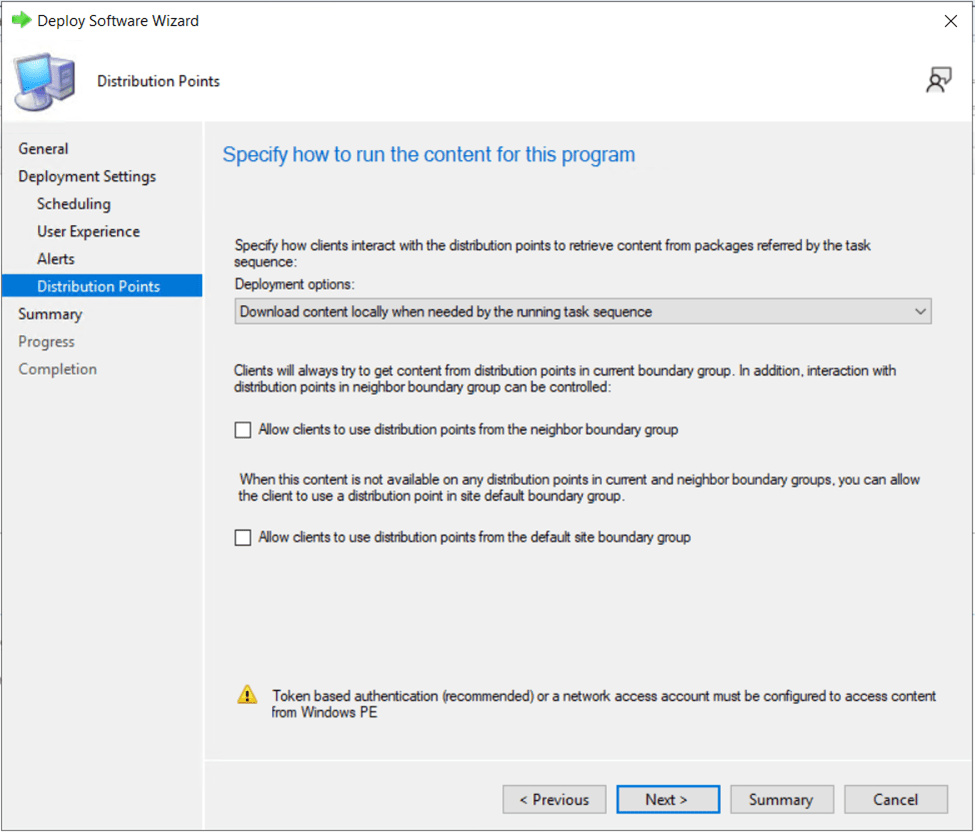
On the distribution points/program content tab, choose the appropriate settings for how the deployment should run, based on your Configuration Manager site architecture. Click Next.
- Review all deployment settings on the final tab of the wizard, then click Next to finalize the deployment.

- Click Close to complete the deployment wizard.
You can now monitor the deployment of the Windows 11 Update to users from the deployments page. Users should begin to see the Upgrade to Windows 11 task sequence show up in Software Center on their devices under the Operating Systems section, the next time the device checks in and retrieves the new deployment.
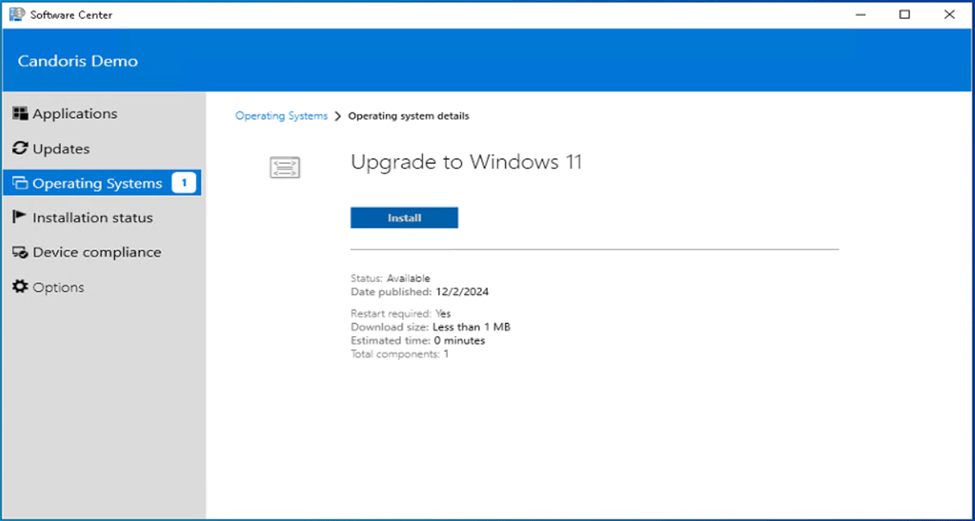
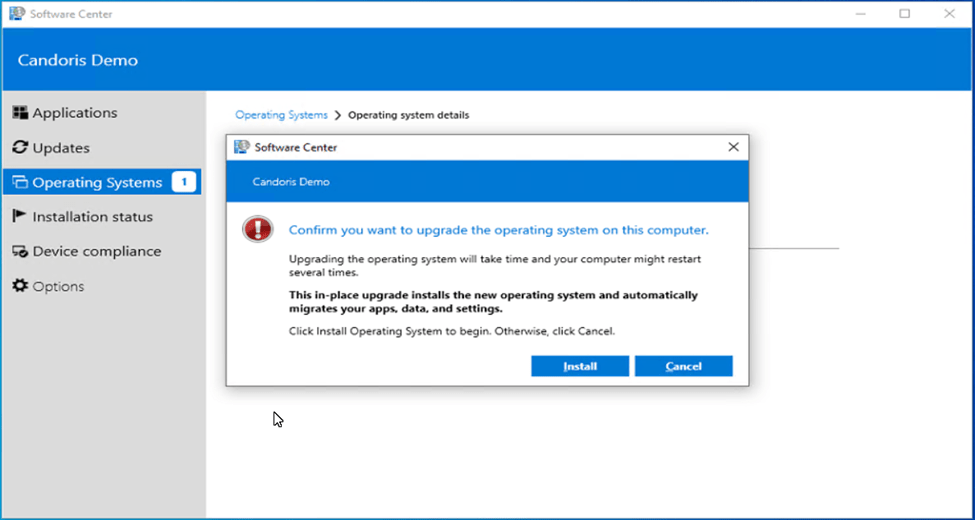
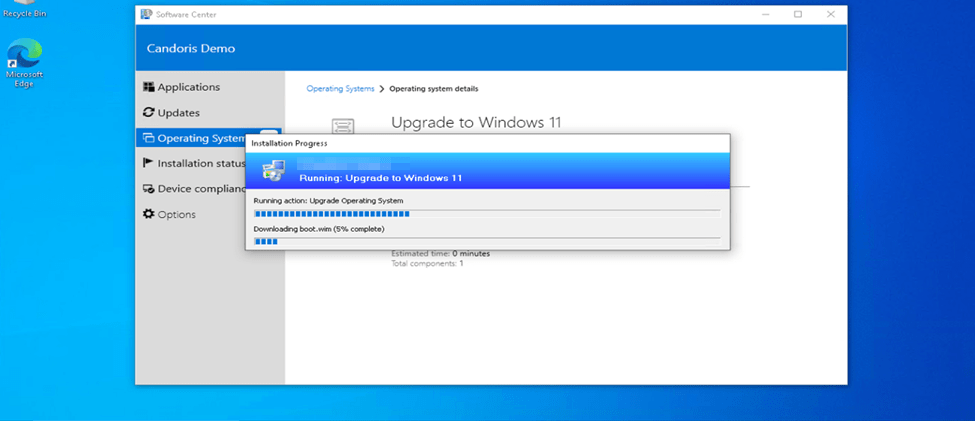
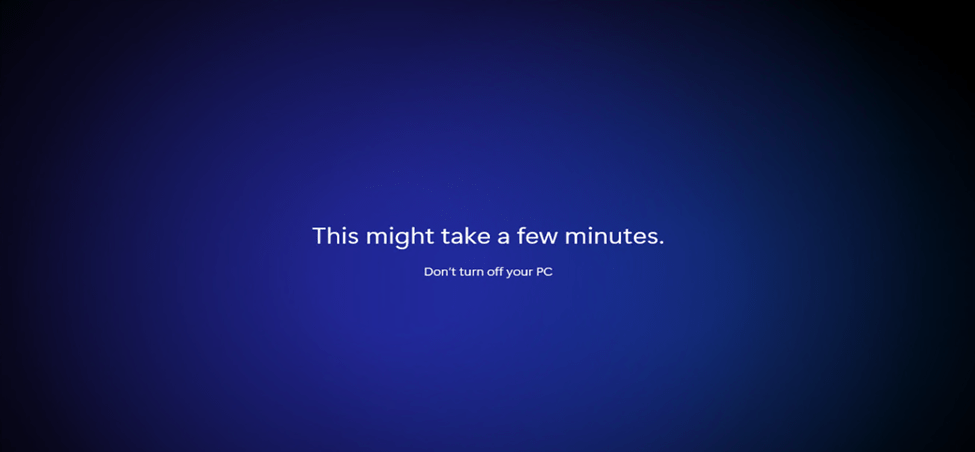
User Experience Upgrading to Windows 11 from a Task Sequence
In an available deployment of the task sequences to device collections, users can initiate the upgrade to Windows 11 from Software Center.
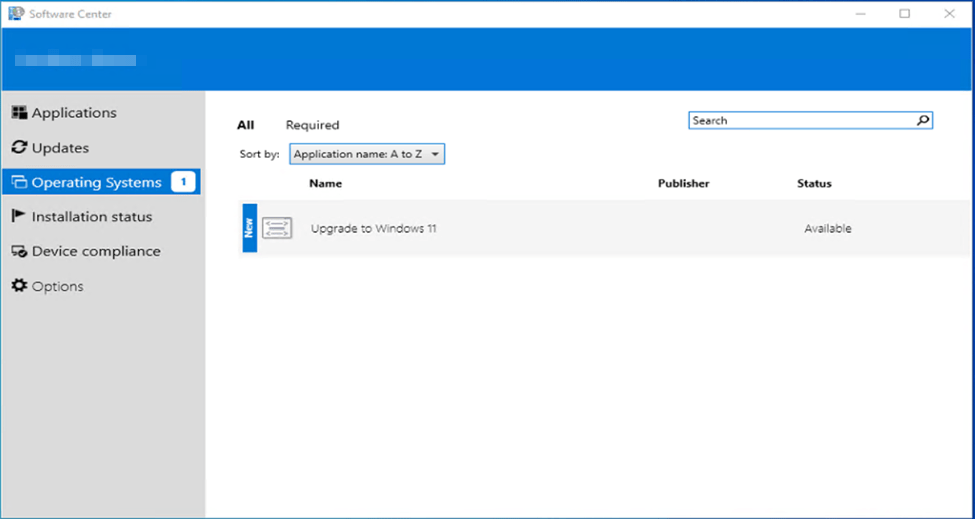
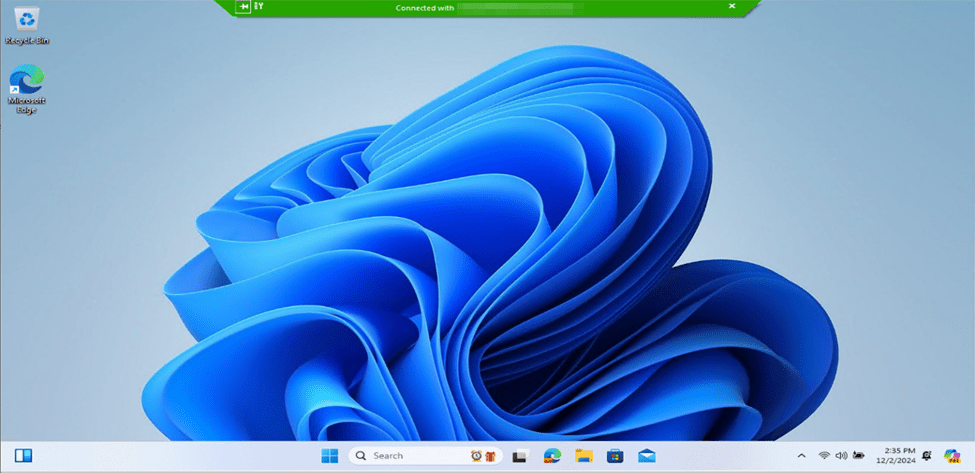
Instruct users to select the task sequence, then click Install when there is a convenient time for them to perform the upgrade to Windows 11. Here’s several screenshots of what the user experience will look like. This particular upgrade was done on a physical Dell laptop and took approximately thirty-five minutes from start to finish.


Continue to monitor the Windows 11 Upgrade Readiness dashboard and deployment success of the upgrade task sequence for users that manually initiate the upgrade. When you are ready to take a more forceful approach to the upgrade, switch to a required deployment type for the task sequence, being cautious not to target too many devices at once.
Are you finding the content on my site particularly helpful? Please consider donating to help me offset the costs of maintaining this site. Your support is greatly appreciated!


Leave a comment